
You are using an out of date browser. It may not display this or other websites correctly.
You should upgrade or use an alternative browser.
You should upgrade or use an alternative browser.
N9460D 'A' model Super Cub
- Thread starter AirPigz
- Start date
AirPigz
Registered User
Warsaw, Indiana
I happen to like the paint scheme
Wow, thank you for sharing those pix, they are very inspiring. I just got back to finishing the fabric on the elevators at 8:30pm tonight... Those pix will keep me going!
Martt
N9460D
RoggenPilot
Registered User
Denver area
RagAero in Placerville CA did the rebuild recover paint. I bought it in its current condition. It's now hangared at Boulder Municipal. They use that that thing behind it to go places, the poor joyless souls.
RoggenPilot
Registered User
Denver area
It is a P210, but my other roommate is a Champ.
skipster
Registered User
Altamont NY
That is incorrect, that style was used later. I have made up exact copy masks for the Piper script that would be correct for 1959.Ok, so I have it confirmed that the Piper name in that style of script was in use in 1959, so I have taken that as a base and built up 'Super Cub' in that letter style to put on the project airplane. I don't think the airplanes came out of the factory with this specific graphic on the airplane, but that's ok... not looking to be 100% authentic, just authentic to the age.
I was unable to locate a version of "Super Cub' that was using this exact style. There's one close, but it's clearly not the exact style as the 'Piper', so I made my own last night and this morning.
This pic shows what I came up with. Still a little rough on the edges, but I'll clean that up and eventually have some vinyl stencils made.
View attachment 31498
Let me know what ya think...
Martt
N9460D


RagAero in Placerville CA did the rebuild recover paint. I bought it in its current condition. It's now hangared at Boulder Municipal. They use that that thing behind it to go places, the poor joyless souls.
Well heck, I haven't been able to get to the PRB Consular Office to get an Entry Visa to the People's Republic of Boulder. But maybe if you can sneak out some time, like some of fly-ins.... And reliable rumour that there has gotten to be a pretty good cadre of Supercubs just up the road at Longmont, with occasional visitors from Erie and Platte Valley. Except when they fly out to places like La Garita. Or so I've heard

Paint job like the one just posted of the '59 PA-18A in factory cotton I flew quite a bit in a land far ago and long, long, away. The Piper and heck, even Cessna paint designers in that era had an eye for the paint lines which really complemented the aeroplane's lines. That one would be a LOT of work to lay out, though.
Thanks. cubscout
AirPigz
Registered User
Warsaw, Indiana
View attachment 31514 This picture shows a brand new 1959 PA18-95 at Lock Haven factory. I have stencil/ mask to duplicate the Piper on the cowling. Click on picture
I've seen that the script 'Super Cub' wasn't put on the airplanes in 59, but I thought that style was in use with putting 'Piper' on various other of their airplanes. Do you have any definitive info on when that script style was first used? The goal isn't to be accurate to factory paint, just accurate to the time period.
Thanx.
Martt
N9460D
RoggenPilot
Registered User
Denver area
I married a genuine PRB woman, so I get conjugal visits. I still maintain a residence in Columbine. Fortunately the bride is a Wyoming ranch girl who grew up in the back of her dads ranch Supercub
i told the airport manager at BDU that my Cub is an "electric" model, so I can hangar there. And it's got an alternator and a battery
i told the airport manager at BDU that my Cub is an "electric" model, so I can hangar there. And it's got an alternator and a battery
AirPigz
Registered User
Warsaw, Indiana
Looks like 1951 was the first time for using that script, with the horsepower (125) after it. I see "Piper" in that script beginning in 1960
Thanx for the info. That makes it work for me... again, just trying to fit the era in general.
Martt
AirPigz
Registered User
Warsaw, Indiana
Here's a long update with a lot of pix.
I've been working 70 hours a week on the project trying to get done in time to make it to Oshkosh. Might make it, might not. Since starting the first fabric work on May 19th I have the flaps, ailerons, stabs, elevators, rudder and gear legs all covered, stitched, and taped. Also, as of today, I have the first wing covered, stitched, and about half taped, along with the second wing almost finished covered and will be rib stitching on Saturday. If things go as hoped, I'll be ready to start spraying fill on the 24th. I'm using the Stewart System and so far I'm really liking it. Back in the 80's I used the Ceconite process on a set of T-Craft wings, and then in the 90's I did a Citabria in Stits. I'm using Ceconite fabric this time (Stewarts doesn't make fabric) and will be doing color in their EkoPoly.

Some of you might remember that my thread here started with questions about float fittings. Here's a pic of the Dakota Cub fittings that I welded on, and specifically the Super Fil that I added on either side of the weld to help smooth out the transition. My desire all along is to have the fitting look more like a part of the airplane under the fabric than they typically look. I think this will help a lot, but won't really know until it's all done.

Here's a close up looking down the leading edge tape on one of the ailerons. I find that the unique nature of the EkoBond glue makes it easy getting the tapes on really straight. Some of you might wonder about that pinked edge at the near end of the aileron... I like to finish off the ends with an end cap of fabric that gets cut around the radius and then folded over, but then I cover the fold-over with a tape near the edge so you don't see any fold-overs directly. This also allows me to run that last chord-wise tape in a straight line even if the end rib isn't quite true.

This is a close up of the rudder trailing edge where the fabric overlap glue joint is on the left side. I mixed up some Super Fil and applied a very thin layer with a crisp metal putty knife to help mask that overlap. I don't have a pic handy of the trailing edge tape, but I'm pretty sure once I spray fill on it you won't be able to see that overlap joint thru it.

The gear legs have the 1/2" square tube welded in for the 2,000# gross weight kit (centered on the front and rear tubes) so the inner surface isn't quite as funky shaped as a standard legs. I wanted a clean way for the brake line to exit so I made some aluminum 'washers' with a circle patch over them. Seems to have turned out pretty nice.

Here's a close up of a tape going over the stab stitches. I use flat rib lacing cord and the staggerwing knot. My research on the Stewarts process really pointed out that a key to making the finish process come out really nice is making sure that excess EkoBond is removed carefully and quickly from the top and edges of the tape. Of course I won't know until I start spraying, but it looks to me like the edges are really going to look nice. I also go over the pinked edges with an iron at about 250 degrees which really makes them look tidy.


I've watched the Stewart videos on youtube several times to pick up on the details, but I wasn't keen on using the blue paper shop towels for removing the excess EkoBond... so I thought I'd try the paper towels that we use in our home. They are cheap WalMart towels that are perfed at far less than full size (their term on the package is: 'sized 4 spills') - they sell the same towel full size so you have to look for 'sized 4 spilles'. They seem to be working fantastic. I fold them in half, and then again into quarters. That gives me 8 surfaces I can use to pick up EkoBond with by folding them as I use them. By having the towel nice and flat, the wipe is very smooth (compared to just using a towel in a wad) and I also get great mileage this way. I'm guessing I will wind up using about 6 rolls of these paper towels for the entire covering process... about $11 worth. I also don't have much trash since they are very flat once they've done their job.

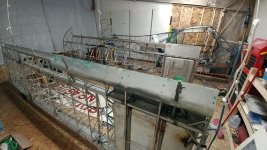
I work alone and often their isn't even anyone around that could help me turn the wings over, so I came up with the idea of hanging them leading edge down for the entire process. I install the fabric, stitch, tape, and will spray fill and color without ever moving the wings. I have 3 different loops in the rope they hang with that allows me to change the height by moving the carabiner. And I can move them to a different height by myself. So far, the middle position is perfect for installing fabric, stitching, and taping. I will likely move them to the highest position when I spray the leading edges. This arrangement also makes good use of the 20' x 25' space that I'm doing all the work in.

I have a blue and a tan tarp on the floor anywhere that the fabric will touch. I installed heavyweight Ceconite 101 on the lower surface, running from the spar on the top of the leading edge and then around the flap and aileron well. Then the the upper surface, which is medium weigh Ceconite 102, is installed from the spar on the bottom of the leading edge (with a 3" glue joint) up an over the top of the wing to the flap and aileron well. This gives a full double layer of fabric on the leading edge, with the under layer being heavyweight. Best of all, no tapes will be in the radius of the leading edge. A 4" tape will cover the 3" glue joint on the bottom of the wing over the spar area.

The first wing as I make the 3" overlap seam on the lower surface. The bottom of the wing has the heavyweight fabric lightly shrunk, and the medium weight is hanging down to the floor as I make that glue joint. I then pull it up and spring clamp in a few places as I get it in position and glued at the trailing edge and tip.

Here are both layers installed on the first wing, with the 3" glue joint near the spar. The leading edges look fantastic with that double layer. I also made new skins anywhere there were dents (5 new sections total) so it looks like these leading edges are gonna look awesome.

It took me 12 hours of labor to stitch the first wing. Flat cord slows the process down a bit but I think it's totally worth it. I don't like having chalk line dust on the wing so I lay out the stitch locations with a 6 foot steel rule. I made a needle out of 3/32" welding rod with the slightly bent tip. Works great. I lay on the floor to run the needle from the top to the bottom side and then back to the front for the first 5 stitches, then I stand on a step ladder and reach over the trailing edge for the rest of the stitches. I think this is much nice than bending over for every stitch... especially now that I'm 56 years old!

Both wings last night just before giving up for the night. The near wing only has the bottom fabric glued, not yet shrunk.

Here's the second wing today with its lower fabric lightly shrunk and the upper fabric pulled up and over as I get ready to trim and glue it in place. The 3" overlap seem can be seen near the floor.
I've made a lot of progress in the last 4 weeks, and I have the fatigue to prove it! However, I'm feeling really good about the work and I'm hopeful I can keep the pace up and have the airplane in the air before long. I welcome comments but I will say that my priority is working on the airplane, so I might not be able to respond for a while.
Martt
1959 PA-18A
N9460D
I've been working 70 hours a week on the project trying to get done in time to make it to Oshkosh. Might make it, might not. Since starting the first fabric work on May 19th I have the flaps, ailerons, stabs, elevators, rudder and gear legs all covered, stitched, and taped. Also, as of today, I have the first wing covered, stitched, and about half taped, along with the second wing almost finished covered and will be rib stitching on Saturday. If things go as hoped, I'll be ready to start spraying fill on the 24th. I'm using the Stewart System and so far I'm really liking it. Back in the 80's I used the Ceconite process on a set of T-Craft wings, and then in the 90's I did a Citabria in Stits. I'm using Ceconite fabric this time (Stewarts doesn't make fabric) and will be doing color in their EkoPoly.
Some of you might remember that my thread here started with questions about float fittings. Here's a pic of the Dakota Cub fittings that I welded on, and specifically the Super Fil that I added on either side of the weld to help smooth out the transition. My desire all along is to have the fitting look more like a part of the airplane under the fabric than they typically look. I think this will help a lot, but won't really know until it's all done.
Here's a close up looking down the leading edge tape on one of the ailerons. I find that the unique nature of the EkoBond glue makes it easy getting the tapes on really straight. Some of you might wonder about that pinked edge at the near end of the aileron... I like to finish off the ends with an end cap of fabric that gets cut around the radius and then folded over, but then I cover the fold-over with a tape near the edge so you don't see any fold-overs directly. This also allows me to run that last chord-wise tape in a straight line even if the end rib isn't quite true.
This is a close up of the rudder trailing edge where the fabric overlap glue joint is on the left side. I mixed up some Super Fil and applied a very thin layer with a crisp metal putty knife to help mask that overlap. I don't have a pic handy of the trailing edge tape, but I'm pretty sure once I spray fill on it you won't be able to see that overlap joint thru it.
The gear legs have the 1/2" square tube welded in for the 2,000# gross weight kit (centered on the front and rear tubes) so the inner surface isn't quite as funky shaped as a standard legs. I wanted a clean way for the brake line to exit so I made some aluminum 'washers' with a circle patch over them. Seems to have turned out pretty nice.
Here's a close up of a tape going over the stab stitches. I use flat rib lacing cord and the staggerwing knot. My research on the Stewarts process really pointed out that a key to making the finish process come out really nice is making sure that excess EkoBond is removed carefully and quickly from the top and edges of the tape. Of course I won't know until I start spraying, but it looks to me like the edges are really going to look nice. I also go over the pinked edges with an iron at about 250 degrees which really makes them look tidy.
I've watched the Stewart videos on youtube several times to pick up on the details, but I wasn't keen on using the blue paper shop towels for removing the excess EkoBond... so I thought I'd try the paper towels that we use in our home. They are cheap WalMart towels that are perfed at far less than full size (their term on the package is: 'sized 4 spills') - they sell the same towel full size so you have to look for 'sized 4 spilles'. They seem to be working fantastic. I fold them in half, and then again into quarters. That gives me 8 surfaces I can use to pick up EkoBond with by folding them as I use them. By having the towel nice and flat, the wipe is very smooth (compared to just using a towel in a wad) and I also get great mileage this way. I'm guessing I will wind up using about 6 rolls of these paper towels for the entire covering process... about $11 worth. I also don't have much trash since they are very flat once they've done their job.
I work alone and often their isn't even anyone around that could help me turn the wings over, so I came up with the idea of hanging them leading edge down for the entire process. I install the fabric, stitch, tape, and will spray fill and color without ever moving the wings. I have 3 different loops in the rope they hang with that allows me to change the height by moving the carabiner. And I can move them to a different height by myself. So far, the middle position is perfect for installing fabric, stitching, and taping. I will likely move them to the highest position when I spray the leading edges. This arrangement also makes good use of the 20' x 25' space that I'm doing all the work in.
I have a blue and a tan tarp on the floor anywhere that the fabric will touch. I installed heavyweight Ceconite 101 on the lower surface, running from the spar on the top of the leading edge and then around the flap and aileron well. Then the the upper surface, which is medium weigh Ceconite 102, is installed from the spar on the bottom of the leading edge (with a 3" glue joint) up an over the top of the wing to the flap and aileron well. This gives a full double layer of fabric on the leading edge, with the under layer being heavyweight. Best of all, no tapes will be in the radius of the leading edge. A 4" tape will cover the 3" glue joint on the bottom of the wing over the spar area.
The first wing as I make the 3" overlap seam on the lower surface. The bottom of the wing has the heavyweight fabric lightly shrunk, and the medium weight is hanging down to the floor as I make that glue joint. I then pull it up and spring clamp in a few places as I get it in position and glued at the trailing edge and tip.
Here are both layers installed on the first wing, with the 3" glue joint near the spar. The leading edges look fantastic with that double layer. I also made new skins anywhere there were dents (5 new sections total) so it looks like these leading edges are gonna look awesome.
It took me 12 hours of labor to stitch the first wing. Flat cord slows the process down a bit but I think it's totally worth it. I don't like having chalk line dust on the wing so I lay out the stitch locations with a 6 foot steel rule. I made a needle out of 3/32" welding rod with the slightly bent tip. Works great. I lay on the floor to run the needle from the top to the bottom side and then back to the front for the first 5 stitches, then I stand on a step ladder and reach over the trailing edge for the rest of the stitches. I think this is much nice than bending over for every stitch... especially now that I'm 56 years old!
Both wings last night just before giving up for the night. The near wing only has the bottom fabric glued, not yet shrunk.
Here's the second wing today with its lower fabric lightly shrunk and the upper fabric pulled up and over as I get ready to trim and glue it in place. The 3" overlap seem can be seen near the floor.
I've made a lot of progress in the last 4 weeks, and I have the fatigue to prove it! However, I'm feeling really good about the work and I'm hopeful I can keep the pace up and have the airplane in the air before long. I welcome comments but I will say that my priority is working on the airplane, so I might not be able to respond for a while.
Martt
1959 PA-18A
N9460D
Attachments
-
 Paper Towels.jpg117.9 KB · Views: 153
 -
 Folded Paper Towels.jpg120.3 KB · Views: 150
 -
 Wings Hanging Uncovered.jpg146.2 KB · Views: 174
 -
 Gear Leg Brake Line Exit.jpg77.6 KB · Views: 150
 -
 Cutting Fabric.jpg129.2 KB · Views: 148
 -
 3 Inch Seam At Spar.jpg86.7 KB · Views: 146
 -
 Rib Stitching.jpg28.6 KB · Views: 168
 -
 Both Wings Low Light.jpg79.3 KB · Views: 154
 -
 Glueing Top On Wing.jpg60 KB · Views: 143
 -
 Both Wings.jpg107.6 KB · Views: 168
 -
 Float Fitting Fairing.jpg96.2 KB · Views: 165
 -
 Aileron Detail.jpg58.9 KB · Views: 147
 -
 Rudder Up Close.jpg67.5 KB · Views: 158
 -
 Tape Up Close.jpg71.7 KB · Views: 159
Last edited:
Bearhawk Builder
FRIEND
In the woods
Nicely done! As long as you wipe all the glue off or through the fabric your pinks will look great. The Ekofill is somewhat thinner than some other mid coats so it's harder to 'bury' the tapes but I find you can lightly hit the pinks with the iron after the Ekofill is sprayed if needed and then carefully sand the edges. Do this between coats and the edges look really good.
AirPigz
Registered User
Warsaw, Indiana
The plan early on in the project was to cover the slightly beat up red painted interior panels with a red leather as a way of hiding imperfections and adding a great look and smell. I found a source for really nice leather at a great price and ordered a couple color samples. Both were close but one was a bit thinner with a little less texture, so I choose it.


I got started covering and installing the panels a couple days ago (while moving various parts of the project forward at once) and the results so far have been awesome. I'm using 3M Yellow Super Trim Adhesive and I'm confident it's gonna do very well. It's $26 for a 19oz can, so it's not a cheap way to go, but cheap adhesive is rarely ever a good choice. I think the most important step is using a roller that you can really lean into to help the adhesive that you apply to both parts make really good contact. This thin leather used with this adhesive looks really nice going around the outside corners... nice tight radius.
I hammered out the bigger dents, did some straightening, and used some professional bondo designed for really small imperfections to smooth out the tiny dings. Now that some of the the panels are covered, they are almost perfectly smooth... really couldn't be any happier with the results. Once the seats are in, which will be a combo of the same red leather and a cream leather, I think it's gonna all look amazing.
And yes, I left the hopper mounting stub on both sides of the fuselage and you can see the left one pushing against the leather. I've got my reasons for leaving them, and so far I'm thinking the leather tent over them is the least noticeable solution to covering them up.
Martt
Warsaw, Indiana
N9460D
Attachments


Cub junkie
Registered User
My Moms basement
Nice work. I know you wrote about taking this ship to Oshkosh. That would be nice but the Piper nuts would really like to see this bird at Sentimental Journey next year in my opinion.
AirPigz
Registered User
Warsaw, Indiana
Nice work. I know you wrote about taking this ship to Oshkosh. That would be nice but the Piper nuts would really like to see this bird at Sentimental Journey next year in my opinion.
Thank you. The airplane will be living in California (belongs to a brother I have out there) but I might be able talk him into letting me fly it across the country to Sentimental next year. That would sure be an awesome adventure. I went to one of Clyde Smith's workshops last November and now I have Lock Haven desires : )
Martt
AirPigz
Registered User
Warsaw, Indiana
I've been working 7 days a week (70+ hours a week) for the last 6 weeks... fabric work is basically done and on to some of the paint finishing now. I got the left wing sprayed a few days back and it turned looking really nice. I've now experienced the full Stewart Systems process and I really like it.


I have little experience painting large objects, and also haven't used a real spray gun much, tho I did cover and paint a Citabria in the 90's, so I've been careful to try to research how to do things and have paid close attention to the specified Stewart's procedures. I'm using a DiVilbiss Finishline 4 waterborne gun, and a large compressor able to supply the minimum 23psi at 13cfm. I've used the updated Stewart's procedure of brushed, thinned ekobond to fill the fabric weave instead of the previous procedure of using brushed ekofill. After 3 crosscoats of gray ekofill with some sanding I'm doing 2 crosscoats of white ekoprime and a lot of detailed sanding. The ekoprime is really great to sand and it doesn't have the somewhat clammy feel that ekofill does. Plus, the white color makes it really easy to see minor imperfections.
On the left wing I sprayed the Daytona White ekopoly base color with 6 crosscoats on the top and 4 on the bottom. This paint is applied in thin 'fog' coats to build up the color saturation, then finished with a final 'wet' coat. This procedure of really thin coats is new to me so I was a little uncertain applying it. I'm also putting in the full amount of 'flattener' in the paint (2 parts paint, 1 part flattener) and I didn't know how that would affect the look of the 'wet' coat as it was sprayed. As a result, I didn't have the wet coat as wet as it really should have been. I had full color saturation, but I did not have an even and correct sheen between the bays. It was only noticeable when the light was in the right spot, but I confirmed the problem by moving the wing outside into the sun the day after painting. So, I decided I would scuff sand the entire wing (these paints must be scuffed for adhesion) and recoat. I added 3 more crosscoats (EDIT: I had said 4 crosscoats originally but it was 3) to both the top and bottom, and made sure that the wet pass truly went on with a wet look. This recoat was done 26 hours after I had sprayed the first coats. I was pleased to see that not only did I get the even sheen I needed, but the flattener did indeed soften the gloss quite a bit from the way it looked when it was truly wet on the wing.
I learned a lot in that relatively short period of time, and fortunately, my missteps were easy to fix. 24 hours after spraying the recoat of Daytona White. I started masking for the Santa Fe Red leading edge. Since I work alone and wouldn't have quick access to a helper to turn a wing over, I have done all of the wing fabric work with the wing hanging leading-edge-down. This has worked surprising well from fabric install, rib stitching, tape application, fill and sand, and color coat. I wasn't sure what to expect trying to mask a spanwise line tho hanging this way. Turned out to be a bit of a challenge but no problem at all. I first ran a line of making tape about 1/8" from the desired line, then I put a 1/4" 3M fineline #218 tape on top of the masking tape and right on the desired line. then I masked off the entire wing with thin plastic sheet and more masking tape. The curve around the tip was all eyeballed (around midnight actually) and ultimately turned out to be easier than I expected, but still a lot of work. I also had the wing hanging in the highest of the 3 positions I had in my hanging ropes, which put the leading edge high enough that I could lay under and spray the nose.
I didn't get spraying until after 1am, and by then the temperature had dropped and the humidity was rising. By the time I had the first fog coat on the humidity was 76% and rising. 75% is the stated max for spraying, so I was heading into a problem. I decided to heat the space to see if that would help, and it did. I ran the heat up to 85 degrees and got the humidity down to 70%. The ekopoly needs to tack up between fog coats, and the high humidity was really slowing that down. Once I got it back down, the tack time reduced significantly and I could get back to applying more coats relatively quickly. I'm guessing I applied around 10 fog coats of the red on the leading edge. At about 3:15am I sprayed the final wet coat and immediately pulled the fineline tape off. The edges looked fantastic, which was a huge relief.
I came back about 10am and removed the plastic sheet and masking tape and was really pleased to see how smooth the transition line was between the two colors. You can just barely feel it. Really glad I chose to pull the fineline tape right away, otherwise there would be a noticeable edge at the color change. All the masking worked out great, but I did have a few spots where the red bled under the tape when it went over a pinked tape edge. At about 2pm I used a pair of precision tweezers and a 4x magnifying glass to gently scrape the bleed under off before the paint before fully cured. The spots were small, you wouldn't have even noticed them from 10 feet away, but nice to have the line look pretty much perfect even up close.
I'm hoping to spray the base color on the fuselage today, and with what I've learned so far, I'm confident I can do a good job the first time around.
I'm very happy with the Stewart System. These colors look just right for a vintage style Super Cub, and the satin luster with the flattener added just looks fantastic.
Martt Clupper
Warsaw, Indiana
N9460D
Attachments


Last edited:
cubpilot2
SPONSOR
Anchorage Alaska
The wings look great!
What was your reason for using heavy wt. fabric on the lower side and medium wt. on top? Was it to reduce the "scalloping"?
I have not seen a wing covered with the fuel tank installed before. How did that work out for your stitching with the padding on the ribs?
Thanks for the detail of your experience with the Stewarts. I've been thinking of using it on my next project.
AirPigz
Registered User
Warsaw, Indiana
The wings look great!
What was your reason for using heavy wt. fabric on the lower side and medium wt. on top? Was it to reduce the "scalloping"?
I have not seen a wing covered with the fuel tank installed before. How did that work out for your stitching with the padding on the ribs?
Thanks for the detail of your experience with the Stewarts. I've been thinking of using it on my next project.
I figured the tighter weave of medium weight would make the top look a little nicer, and the extra strength of heavyweight on the bottom would help keep the fabric from vibrating as much in the prop blast, would make it a little less likely to be damaged if something is thrown up at the wing by a tire, and, it also worked out nice in that I installed the fabric such that I have a full double layer of fabric covering the leading edge, and that first layer is the heavyweight fabric. I get the protection over the screws and edges with the heavyweight fabric, along with a general smooth look, but the tighter weave of medium is what you see on the outside of the leading edge. The glue joint for the two is back at the spar on the lower side, covered by a 4" tape that is centered over the spar. So, there are no tapes on the leading edge until that one over the spar on the bottom, and I have a full double layer of fabric. I wont know for certain how well that works/looks until I have the wings on the fuselage, but looking at the red leading edge as it is, no tapes there sure looks nice.
On the fuel tank: I made a special hook/needle tool to be able to stitch the tank ribs with the tank in place. The hook tool allowed me to get just over the rib (going in the hole in one side and out the hole on the other side) then I would feed the cord into the small drilled hole in the end of the hook and pull the hook back out, effectively pulling the cord over the rib. From there I'd tie the knot, then switch to the regular needle to get to the next stitch location, then use the hook tool again.
Stewarts Systems updated their installation manual in February. The revision #3 (2/01/2017) manual can be downloaded on the support page at http://www.stewartsystems.aero/support.aspx and it includes the info on using thinned ekobond to seal the weave instead of the previous method of using ekofill. The previous method required wetting the fabric to help with penetration into the weave. The current method requires that the fabric be cleaned with ekoclean, then rinsed and dried, but you don't wet the fabric before applying the thinned ekobond.
The older videos on youtube from Stewart's are very helpful in understanding the way things work with the system (I watched some of them several times) tho it's most important to read, understand, and follow the directions laid out in the revised installation manual, especially since that's where you'll find the update on sealing the weave.
Martt
N9460D
Bearhawk Builder
FRIEND
In the woods
Nice write up on the Stewart's paint process. Your results appear to be very nice. Interesting on the ekobond as a filler, I'll have to look that up. What do think the advantage is? Sound like you did everything right, watching humidity, heating when needed etc. The fog coat/wet coat process is actually an easy spray process right? Almost eliminates the risk of runs. If when you pull your tapes you have some bleed under a cloth dampened with denatured alcohol will clean it off before its cured. Just a heads up, covering fresh paint with plastic sheeting as a masking for a contrasting color can cause blushing spots. Ask how I know.
AirPigz
Registered User
Warsaw, Indiana
Nice write up on the Stewart's paint process. Your results appear to be very nice. Interesting on the ekobond as a filler, I'll have to look that up. What do think the advantage is? Sound like you did everything right, watching humidity, heating when needed etc. The fog coat/wet coat process is actually an easy spray process right? Almost eliminates the risk of runs. If when you pull your tapes you have some bleed under a cloth dampened with denatured alcohol will clean it off before its cured. Just a heads up, covering fresh paint with plastic sheeting as a masking for a contrasting color can cause blushing spots. Ask how I know.
My guess on the ekobond as a weave sealer, which I've heard is how the process was instructed at some point in the past (before the change to using a brushed coat of ekofill), is that the thinned ekobond really easily permeates and encapsulates the fabric, and the ekofill appears to have needed the fabric to be wetted to get good penetration. If the fabric wasn't wetted sufficiently, I'm guessing the bond wasn't as good as it should have been. The switch back to using ekobond makes this critical step easier to get right.
I suppose the fog coat/wet coat process is pretty easy, but it's not what most of us are used to. So it becomes a bit more of a challenge when first using it. Plus, the paint goes on very thin this way which means you have to watch closely to be sure you have full color saturation everywhere.
I'll try some alcohol on the next stripes for removing any bleed under. I didn't look at all of the line details when I pulled the tapes before since it was already 3:30am and I need to be done! It was 7 hours later before I realized there were a few little bleed under spots. Don't know if the alcohol would have worked them.
Thanx for the info on the plastic making sheet.
Martt
N9460D
AirPigz
Registered User
Warsaw, Indiana
Most of my project updates have been going to my facebook page, but figured I should get current here again.
I got the fuselage finished painted and moved down the stairs from the workshop loft area. 4 guys down 21 steps with not much extra clearance, but we didn't make contact anywhere, so that's good!

Got the gear on quickly and moved the fuselage over to a neighboring hangar to finish things up. Built the boot cowl this last week and also got the second wing finish painted. Hoping to be putting the wings on soon. I'll be ready to hang the engine soon too.

Still have the small fabric covered parts to spray ekofill and color on, but will be on that soon. Lots of details yet to go, but getting closer, and sure happy with the way she's looking : )
Martt Clupper
Warsaw, Indiana
N9460D
I got the fuselage finished painted and moved down the stairs from the workshop loft area. 4 guys down 21 steps with not much extra clearance, but we didn't make contact anywhere, so that's good!
Got the gear on quickly and moved the fuselage over to a neighboring hangar to finish things up. Built the boot cowl this last week and also got the second wing finish painted. Hoping to be putting the wings on soon. I'll be ready to hang the engine soon too.
Still have the small fabric covered parts to spray ekofill and color on, but will be on that soon. Lots of details yet to go, but getting closer, and sure happy with the way she's looking : )
Martt Clupper
Warsaw, Indiana
N9460D
Attachments


WanaBNACub
Registered User
Off Airport
Looking really good Martt! I would say you did a fantastic job on the paint, as well as everything else!
AirPigz
Registered User
Warsaw, Indiana
Looking really good Martt! I would say you did a fantastic job on the paint, as well as everything else!
Thank you for the encouraging feedback, I appreciate it! It's been a real bonus for me to have you and your project just out ahead of me to keep me moving forward, and I'm feeling the excitement that you must have now that you're so close. You've done a great job as well... truly makes for an experience of a lifetime. Be sure to triple check everything important and be careful as you prepare to be back in the air

Martt
AirPigz
Registered User
Warsaw, Indiana
Cub is looking good Martt! By the way, nice job on TRM, just finished listening to your episode. [emoji41]
Thanx! I haven't been on or done a podcast for several years so that was a lot of fun. Anyone that likes The Rocketeer movie should check out The Rocketeer Minute podcast, they go over a minute of the movie at a time, and I was a guest host on episode 103 that was posted a couple days ago : http://www.rocketeerminute.com/episodes/minute-103-the-closest
I did several podcast interviews on my own site (http://www.airpigz.com) back in the day but the podcasts aren't hosted any longer, but the website is. Lots of avgeekery there, even if there's isn't much SC stuff.
Martt
AirPigz
Registered User
Warsaw, Indiana
Once again I've been posting most of my updates on my personal facebook page, but figured I better post here again as I've been very thankful for the input that's come from the members here.
For a variety of reasons I'm running behind on the restoration on N9460D but I'm finally getting pretty close to completion. The inclusion of 8 STC mods that weren't in the original plan, plus doing the bulk of the work in an alternative (small) workspace have added quite a bit of time... plus, it's an airplane project, when do those EVER go to plan??
Anyway, the engine is back on, and I painted the upper boot cowl late Saturday night and got to see what it looks like on the airplane yesterday. I think it's looking pretty nice.
The cowling has been a lot of work with paint stripping, replacing some parts, patching some holes, and trying to make the aluminum nose bowl look good. It had a significant collection of dents and dings. I hammered out about the 85% of the ugly and then used filler to dress up another 15%. I figure 95% is good enough at this point. The test fitting yesterday of it and the rest of the cowling went extremely well. I had to make several repairs to the cowling mounting arms, and with a new firewall and boot cowl, I wasn't sure how everything would come back together. Fortunately it's all fitting really well right from the start.


Now that the lower cowl has been fitting once again, I can now get the muffler pin holes drilled and get it mounted permanently. I had the muffler overhauled and those holes aren't in place yet.
The instrument panel is complete and I'm really happy that it's perfectly living up to my vision for it. Simple, retro, and really crisp were the goals there. And the RAM mount for an iPad mini seems to be working exactly as I had hoped. Headset jacks will be up in the left wing root, and after a lot of thought I'm putting the ptt buttons on the stick just below where your hand sits. Even tho my first thought was to mount the ptt slightly left of the stick center (where your little finger is when you hand is wrapped around the stick, I eventually decided that to the right of center makes more sense. A light grip on the stick (with maybe just 3 fingers) actually puts your little finger to the right of the stick center. I'm hoping this pans out well in practice. Time will tell.


The intercom at the far left of the panel is a Sigtronics spa-400 with their 2-1/4" round face. I removed their graphics and added the really simple retro look ones that I made. I used an image of the old 'THROTTLE' marking from the side panel to build up a custom font. The letters I built up where then converted for free on a website I found into an actual font. After building up the graphics for all the markings I had a local sign shop print them on a clear matte vinyl and then cut them out. The original plan was to have vinyl letters cut directly, but the small letters were not working with their equipment. By printing them and then cutting oversize (there's some of the clear vinyl beyond the letter edges) it all worked pretty well. I didn't expect that vinyl would stick well enough in the long run, so the plan was to clearcoat over to seal them in place. I found a rattle can matte clear coat that's actually a 2 part catalyzed polyurethane (once the plunger is pushed and the 2 parts mixed, it has a 48 hour pot life) and it worked really well. It's $25 a can, but seemed cheaper than trying to find an automotive matte clearcoat.

I'm also planning to incorporate a bluetooth unit that should easily allow Foreflight audio (and more importantly, music) to be fed from the iPad into the headsets without interrupting radio or intercom usage.
I made an aluminum tray to mount the handheld in. The mount has nut plates behind the throttle tunnel so it can easily be removed so the radio can just be gone if desired. I also altered the AA battery case that the Sporty's SP-400 has with a 10-32 nutplate inside (that case can't be used with AA batteries now) and have a thumb screw that comes up from underneath the radio to hold it in the tray. The thumbscrew is captured on a line so you can't lose it when you are removing or installing it. Where the radio is mounted makes it easy to see and adjust, keeps it just clear of flap handle operation, and allows the external antenna coax and other connecting wires to quickly disappear under the panel to keep the installation looking pretty clean. It and the iPad will get power from 2 individually fused 12v power ports mounted just back under the panel out of view.

Just a couple thousand things left to do and this ole girl will be flying again : )
Martt Clupper
Open Door Flying
Warsaw, Indiana
N9460D
1959 PA-18A flat top
I'm setting up shop to continue aircraft work going forward... here's the Open Door Flying facebook page.
For a variety of reasons I'm running behind on the restoration on N9460D but I'm finally getting pretty close to completion. The inclusion of 8 STC mods that weren't in the original plan, plus doing the bulk of the work in an alternative (small) workspace have added quite a bit of time... plus, it's an airplane project, when do those EVER go to plan??
Anyway, the engine is back on, and I painted the upper boot cowl late Saturday night and got to see what it looks like on the airplane yesterday. I think it's looking pretty nice.
The cowling has been a lot of work with paint stripping, replacing some parts, patching some holes, and trying to make the aluminum nose bowl look good. It had a significant collection of dents and dings. I hammered out about the 85% of the ugly and then used filler to dress up another 15%. I figure 95% is good enough at this point. The test fitting yesterday of it and the rest of the cowling went extremely well. I had to make several repairs to the cowling mounting arms, and with a new firewall and boot cowl, I wasn't sure how everything would come back together. Fortunately it's all fitting really well right from the start.
Now that the lower cowl has been fitting once again, I can now get the muffler pin holes drilled and get it mounted permanently. I had the muffler overhauled and those holes aren't in place yet.
The instrument panel is complete and I'm really happy that it's perfectly living up to my vision for it. Simple, retro, and really crisp were the goals there. And the RAM mount for an iPad mini seems to be working exactly as I had hoped. Headset jacks will be up in the left wing root, and after a lot of thought I'm putting the ptt buttons on the stick just below where your hand sits. Even tho my first thought was to mount the ptt slightly left of the stick center (where your little finger is when you hand is wrapped around the stick, I eventually decided that to the right of center makes more sense. A light grip on the stick (with maybe just 3 fingers) actually puts your little finger to the right of the stick center. I'm hoping this pans out well in practice. Time will tell.
The intercom at the far left of the panel is a Sigtronics spa-400 with their 2-1/4" round face. I removed their graphics and added the really simple retro look ones that I made. I used an image of the old 'THROTTLE' marking from the side panel to build up a custom font. The letters I built up where then converted for free on a website I found into an actual font. After building up the graphics for all the markings I had a local sign shop print them on a clear matte vinyl and then cut them out. The original plan was to have vinyl letters cut directly, but the small letters were not working with their equipment. By printing them and then cutting oversize (there's some of the clear vinyl beyond the letter edges) it all worked pretty well. I didn't expect that vinyl would stick well enough in the long run, so the plan was to clearcoat over to seal them in place. I found a rattle can matte clear coat that's actually a 2 part catalyzed polyurethane (once the plunger is pushed and the 2 parts mixed, it has a 48 hour pot life) and it worked really well. It's $25 a can, but seemed cheaper than trying to find an automotive matte clearcoat.
I'm also planning to incorporate a bluetooth unit that should easily allow Foreflight audio (and more importantly, music) to be fed from the iPad into the headsets without interrupting radio or intercom usage.
I made an aluminum tray to mount the handheld in. The mount has nut plates behind the throttle tunnel so it can easily be removed so the radio can just be gone if desired. I also altered the AA battery case that the Sporty's SP-400 has with a 10-32 nutplate inside (that case can't be used with AA batteries now) and have a thumb screw that comes up from underneath the radio to hold it in the tray. The thumbscrew is captured on a line so you can't lose it when you are removing or installing it. Where the radio is mounted makes it easy to see and adjust, keeps it just clear of flap handle operation, and allows the external antenna coax and other connecting wires to quickly disappear under the panel to keep the installation looking pretty clean. It and the iPad will get power from 2 individually fused 12v power ports mounted just back under the panel out of view.
Just a couple thousand things left to do and this ole girl will be flying again : )
Martt Clupper
Open Door Flying
Warsaw, Indiana
N9460D
1959 PA-18A flat top
I'm setting up shop to continue aircraft work going forward... here's the Open Door Flying facebook page.
Attachments


Last edited:
Bearhawk Builder
FRIEND
In the woods
Martt, really like the simple panel. Where did you find the slip indicator? Is that custom printing?
AirPigz
Registered User
Warsaw, Indiana
Martt, really like the simple panel. Where did you find the slip indicator? Is that custom printing?
Thanx... it's the vacuum turn coordinator that was in the airplane but I removed the dual venturies and had no plan to include any vacuum instruments in the restoration, so I perked up when Keystone Instruments mentioned they have modified some of them to just simply be a nice slip indicator. With the needle removed and the hash marks gone it makes a perfect place for some custom graphics. So I built up that copy of the old Piper logo and added Super Cub then too so they could silk screen those graphics on the face.
I'm a big fan of disciplined coordinated flight, so having a nice big (and very attractive) ball front and center should encourage my brother (who the airplane is for) to pay attention to his feet : )
Similar threads
- Replies
- 9
- Views
- 4K
- Replies
- 40
- Views
- 18K
- Replies
- 10
- Views
- 5K