
COLLEGE STATION, TX
I wanted to make a few notes about my experience installing the B&C generator and starter on my PA-18-95. To prep to cut off the starter pivot shaft, I first used Flex Seal tape. If you haven't tried it, it is probably the most sticky and tough stuff on the market. It isn't just marketing hype, it is tough. I cleaned inside the engine with rags and brake clean and that was enough for the tape to stick well, too well. It took pliers to pull it loose. I used strips like paper mache to form up a sealed barrier with one hole for the shaft to stick through.

For extra safety, I then laid in a layer of modeling clay, about 1/4" think except around the shaft where it was pretty thin. It was double sealed at this point.

NOTE: You have to resign yourself to the fact that if you have an accident in this process and cut through your clay/tape barrier, you should likely pull the accessory case and flush it well or risk engine contamination. That is my opinion but I think it is the right mind set.
The largest cutoff disc that will fit in there is a Dremel disc. I went through probably 10 of them to make all the cuts. It took me three cuts to get it all the way down. I tried my battery Dremel, that was a joke. I went to Walmart and bought a cheapie 110 volt Dremel knockoff and it went through the shaft pretty well. I used great care to not slip off and kit the seal and was successful. just go slow and take breaks.
Total cut time for three cuts was about an hour. I then broke the corner of the remaining stub with a fine stone on the Dremel. Here are the shaft pieces afterward.

Next I washed my clay cup out with Mineral Spirits and dried it (the clay) with rags. There was a nasty layer of ground disc and metal impregnated in the clay so I as happy it was there to trap the mess. Then I peeled the clay out in one piece and then the tape. The tape was sealed together so well it came out in a single piece but it took duck bill pliers to peel it. Once peeled, there was tiny ring of filings around the base of the shaft because it was a bit magnetized. I used a Q-Tip to wipe those off. I feel completely sure no filings got into the engine but flushed the shaft and gear with brake clean and drained the oil for good measure. A magnet in the oil came out clean.
Here is the final product. It looks like there is a bit of shaft still there but it is flush within 1/16 of an inch from that shoulder.

The starter was pretty to install after the cutting was done, just bolt it in and mount the solenoid and switch.
For the generator, I used the BC433 but I bought it from Classic Aero as a kit along with the regulator. Doug was very helpful and the generator comes with a drive gear/coupling set, and if your's is serviceable and new style, you can return it for credit. Mine was old style (of course) and not returnable so that cost me another $500. https://shop.classicaero.info/main.sc Putting the regulator board together took time but every nut, bolt, washer, ring terminal, wire, everything down to gasket sealer and silicone is included in this great kit as well as an STC. The instructions were excellent but it took a good three hours to build the board. The best location I could find was behind the left kick panel in the cockpit. I suspended it with insulated clamps and a piece of aluminum flat bar.

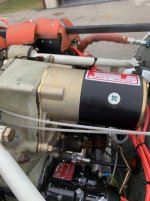
Everything was done, tested, log book entries made and 337's written and here is the final installation.


The battery charges great, the starter spins it over like never before and I am quite pleased with the weight savings which was about 15 pounds if I remember correctly. The only thing I have to remember is to not reach up under the dash for the starter pull cable now!
For extra safety, I then laid in a layer of modeling clay, about 1/4" think except around the shaft where it was pretty thin. It was double sealed at this point.
NOTE: You have to resign yourself to the fact that if you have an accident in this process and cut through your clay/tape barrier, you should likely pull the accessory case and flush it well or risk engine contamination. That is my opinion but I think it is the right mind set.
The largest cutoff disc that will fit in there is a Dremel disc. I went through probably 10 of them to make all the cuts. It took me three cuts to get it all the way down. I tried my battery Dremel, that was a joke. I went to Walmart and bought a cheapie 110 volt Dremel knockoff and it went through the shaft pretty well. I used great care to not slip off and kit the seal and was successful. just go slow and take breaks.
Total cut time for three cuts was about an hour. I then broke the corner of the remaining stub with a fine stone on the Dremel. Here are the shaft pieces afterward.
Next I washed my clay cup out with Mineral Spirits and dried it (the clay) with rags. There was a nasty layer of ground disc and metal impregnated in the clay so I as happy it was there to trap the mess. Then I peeled the clay out in one piece and then the tape. The tape was sealed together so well it came out in a single piece but it took duck bill pliers to peel it. Once peeled, there was tiny ring of filings around the base of the shaft because it was a bit magnetized. I used a Q-Tip to wipe those off. I feel completely sure no filings got into the engine but flushed the shaft and gear with brake clean and drained the oil for good measure. A magnet in the oil came out clean.
Here is the final product. It looks like there is a bit of shaft still there but it is flush within 1/16 of an inch from that shoulder.
The starter was pretty to install after the cutting was done, just bolt it in and mount the solenoid and switch.
For the generator, I used the BC433 but I bought it from Classic Aero as a kit along with the regulator. Doug was very helpful and the generator comes with a drive gear/coupling set, and if your's is serviceable and new style, you can return it for credit. Mine was old style (of course) and not returnable so that cost me another $500. https://shop.classicaero.info/main.sc Putting the regulator board together took time but every nut, bolt, washer, ring terminal, wire, everything down to gasket sealer and silicone is included in this great kit as well as an STC. The instructions were excellent but it took a good three hours to build the board. The best location I could find was behind the left kick panel in the cockpit. I suspended it with insulated clamps and a piece of aluminum flat bar.
Everything was done, tested, log book entries made and 337's written and here is the final installation.
The battery charges great, the starter spins it over like never before and I am quite pleased with the weight savings which was about 15 pounds if I remember correctly. The only thing I have to remember is to not reach up under the dash for the starter pull cable now!
Attachments


Last edited: