• If You Are Having Trouble Logging In with Your Old Username and Password, Please use this Forgot Your Password link to get re-established.
  • Hey! Be sure to login or register!

And so it begins

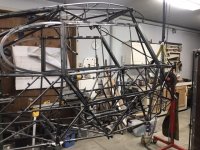
Actually, everything aligns very well. It may not look like it because the tilt adjustment knob on the left side isn’t installed.
I built in space between the hinge bracket and seat back to accommodate seat upholstery.

Mike, I think it was you who said that the Atlee folding seat smashes shins when it folds. Thanks for that heads up which is why I put the latch on it.
 
Depending on who is getting into the back seat it helps if it can fold forward and not hit the shins. So a pivot point more forward would do both. Seems like every time something has power coat apply, then everyone has a great way to change it.:lol:
DENNY
 
Last edited:
I sometimes miss this thread when I'm surfing around because of the name of the thread itself...lol...anyway, this is an amazing documentation of your build to date, and some great responses from the experts here. I'm nearly finished with my 11 build and I see so many areas that are more complicated on your build (mine is a pretty simple affair) being a no flap fun machine not a super camping machine like yours will be. I do have a folding/adjustable fore/aft front seat, but Mine has the old rounded seat back....I don't love it for comfort....but I will fly it as is to start with and see if it is worth modifying later. I always get compliments on my stuff when people (airplane drivers) come to my hangar but I pale in comparison to so many builders here. I'm now ruined.....because I'm not even finished with this build and I want to start another....I fired up my Tig the other day after not using it much for almost a year and a half and boy....I suck, lol one needs to stay in practice to maintain those skills. Keep up the good work, and keep the pictures coming.
foldingseat.jpg
 

Attachments

  • foldingseat.jpg
    foldingseat.jpg
    55.9 KB · Views: 207
I’ve seen a couple folding seats that hinge forward that I like better than mine. The next version will be aluminum, fold differently and probably not recline. This is the one I have and there’s plenty of other tasks to be accomplished without rebuilding something already functional and useable. There are so many things I’ve done two or three times on this project that my scrap pile contains sufficient tonnage to cause a wobble in the earths rotation.

I appreciate all suggestions and comments. Hopefully I read them before I build that part of the project.
 
1F7DADCE-8C70-4A7C-96C3-02A78325E409.jpgA9E8F2EF-3280-406D-A7CA-F949BD261AC8.jpg

I built a fueling step for the left gear using some airfoil profile tubing. Right side will have a long bolt-on sea plane type step that will serve the same function.
 

Attachments

  • 1F7DADCE-8C70-4A7C-96C3-02A78325E409.jpg
    1F7DADCE-8C70-4A7C-96C3-02A78325E409.jpg
    92.7 KB · Views: 208
  • A9E8F2EF-3280-406D-A7CA-F949BD261AC8.jpg
    A9E8F2EF-3280-406D-A7CA-F949BD261AC8.jpg
    82.1 KB · Views: 221
485F7660-67B2-4DF1-ACDA-33AA34CDBDC7.jpg45CD5E50-2F68-4026-8AB2-7D26164C9FCD.jpg
Built a bracket for the trim limit switches and got those set. White horizontal line is on the end of the tab that moves up and down with the trim yoke. Range of motion is between the yellow vertical lines on the switch mounting bracket. Debating if I should put a string potentiometer in for an indicator or go without.

Seat pan is carbon fiber, back is fabric left over from a ventral fin recover.
 

Attachments

  • 485F7660-67B2-4DF1-ACDA-33AA34CDBDC7.jpg
    485F7660-67B2-4DF1-ACDA-33AA34CDBDC7.jpg
    52.4 KB · Views: 237
  • 45CD5E50-2F68-4026-8AB2-7D26164C9FCD.jpg
    45CD5E50-2F68-4026-8AB2-7D26164C9FCD.jpg
    106.8 KB · Views: 213
It's always a good idea to have a trim indicator, even if it's just a wire with a spring on one end. Someday you will thank yourself for putting one in.
 
I should be done with the fuselage fabrication in the next few days. I need to find a competent media blaster in my area and would appreciate any referrals. Local area is Portland, OR./Vancouver, WA.

Also, I’m still trying to figure out if I should powder coat or spray with two part epoxy. The epoxy is something I can do but not the powder coating. If anybody knows a good powder coating business around here I’d like to talk to them too.

Thanks for any help you can provide.
 
Had a slight delay on the project, it snowed 11” here. Not much by other geographical standards but here it’s a big deal. Work could have easily progressed but instead I built a luge run for the neighbor kids and spent the better part of three days sledding and playing in the snow.

Yesterday I started back up on it, thought I was done until I stared at it a while and decided to add a few more tabs for nut plates. A couple hours of shop time today should finish off this phase of the build. Time spent so far building, head scratching and staring at it wondering what I’m doing: 1650 hours.
 
So, I think I’m done with the fuselage! Today I cut a couple nut plate tabs off that I didn’t like the position of and welded on a few new ones. I also made and welded on handles on the upper door and left swing up window. Yesterday I pulled all the control cables, rudder peddles, pulleys, interior panels, seats, etc., etc. out/off and bagged/labeled it. I’ll haul it all to the media blaster/powder coating folks next week.


5B01031D-576A-4395-BFBC-287601003743.jpeg80DA1B91-C2A6-45BB-9499-729E2063B0AD.jpeg
 

Attachments

  • E9E888A3-6BEB-44B4-891A-FA134D4596C5.jpeg
    E9E888A3-6BEB-44B4-891A-FA134D4596C5.jpeg
    137.9 KB · Views: 209
  • 5B01031D-576A-4395-BFBC-287601003743.jpeg
    5B01031D-576A-4395-BFBC-287601003743.jpeg
    131.3 KB · Views: 236
  • 80DA1B91-C2A6-45BB-9499-729E2063B0AD.jpeg
    80DA1B91-C2A6-45BB-9499-729E2063B0AD.jpeg
    114 KB · Views: 231
A70582C7-7CDF-42CA-BDB4-FF45EB02534D.jpegC20E0976-6E62-4B62-9CF9-6EA4454CF51B.jpeg

Got my airframe and all associated parts back from powder coat today. I think they did a great job. I haven’t found any spots that were missed. Business name is All Resistant Coatings in Hubbard, OR. They bead blasted it and did the powder.
 

Attachments

  • A70582C7-7CDF-42CA-BDB4-FF45EB02534D.jpeg
    A70582C7-7CDF-42CA-BDB4-FF45EB02534D.jpeg
    306.6 KB · Views: 178
  • C20E0976-6E62-4B62-9CF9-6EA4454CF51B.jpeg
    C20E0976-6E62-4B62-9CF9-6EA4454CF51B.jpeg
    262.8 KB · Views: 182
Steve,
Thanks for the heads up. That’s a really tight angle so I can see how it might get missed. I’ll look it over and report back.
 
Caution, notice the misalignment of the wire pull. That tab should be in alignment with the cross wire end fork. The angle of that tab varies with different models of floats. Preferably the tab should be moveable in order for it to self align.

Other weld on float fittings have tabs to accommodate hinged wire pulls.

I'm always amazed at the things I learn here. I just started fabricating float fittings, so now I have something else to consider.
 
I'm always amazed at the things I learn here. I just started fabricating float fittings, so now I have something else to consider.
Look at this one for example. Notice there are two attach locations for bolts to act as hinges. One is for the strut, the other is for the wire pull. I don't particularly like that point of the reinforcing plate pointing up into nowhere. This particular fitting wasn't designed with the load paths properly directed. The point should be in alignment with the center of the tube.

IMG_7312-scaled.jpg
 

Attachments

  • IMG_7312-scaled.jpg
    IMG_7312-scaled.jpg
    84.7 KB · Views: 257
I got a good look at the float fittings today and found one spot on one side deep in that angle that looks a bit thin. Everything else looks good. I’ll use an airbrush to coat the thin spot.
 
Prep process was glass bead blasting, clean with compressed air, primer, black then clear powder. Owner says they do 20 to 30 per year.
 
I laid up and vacuum bagged the forward two carbon fiber floor panels yesterday. Pulled them off the table this morning and spent the rest of the day trimming and fitting them into position. Still need rudder peddle holes but otherwise done.


CF5FBC70-2AAE-4502-ADFD-D158382DFF25.jpeg633513AB-C51A-4A7D-B67F-3CABB0D5760E.jpeg
 

Attachments

  • 22E3507D-3DDA-4B8C-A531-581A03717D2E.jpg
    22E3507D-3DDA-4B8C-A531-581A03717D2E.jpg
    119.7 KB · Views: 159
  • CF5FBC70-2AAE-4502-ADFD-D158382DFF25.jpeg
    CF5FBC70-2AAE-4502-ADFD-D158382DFF25.jpeg
    307.2 KB · Views: 186
  • 633513AB-C51A-4A7D-B67F-3CABB0D5760E.jpeg
    633513AB-C51A-4A7D-B67F-3CABB0D5760E.jpeg
    281.2 KB · Views: 185
Wow, those floor boards turned out REAL nice. You definitely have a skill with composite layup.
 
Back
Top