• If You Are Having Trouble Logging In with Your Old Username and Password, Please use this Forgot Your Password link to get re-established.
  • Hey! Be sure to login or register!

Super Cub project

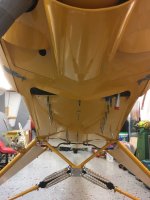
Heck you might as well put the atlee tiedowns on now. Glad I did after seeing pierces pictures of the strut fittings.


Sent from my iPhone using Tapatalk
 
Bearhawk, Beautiful job! Who was your supplier for the side panel fabric. sure looks good. Bill Rusk had similar on his and I always liked that look. Going to copy you!

Blue Skies,
Denny
 
Finishing up a few things to get the wings ready for cover. Where does the nav light wire exit the wing tip, through the wood bow or can I cover the wing with the wire coiled inside and then poke it through above or below the bow? Can't find anything specific in the drawings and not sure how much the nav light mount will cover, don't have them yet.
Thanks guys!
 
Piper ran it through a hole in the bow. I have done it that way and added a hole later but I put an inspection grommet out there so I can access it after covering. The nav light bracket covers a pretty good area so your hole and wire exit will be covered up if you fit before you cut the hole.
 
One more, check me on the aileron cables - 40123-76 to upper horn = 173 11/16" 40123-003 to lower horn = 167 15/16"
Stock wing
The cable assembly chart has several choices but I think these are the right ones??
 
That is what I show.
 

Attachments

  • 40123.PDF
    469.8 KB · Views: 200
  • 42722 Turnbuckle Assembly.pdf
    356.3 KB · Views: 210
Just about done, still have to paint the wings and tail. Final assembly and rigging shouldn't take too long. IMG_0451.JPGIMG_0452.JPGIMG_0454.JPGIMG_0457.JPG
 

Attachments

  • IMG_0451.JPG
    IMG_0451.JPG
    228.7 KB · Views: 312
  • IMG_0452.JPG
    IMG_0452.JPG
    175.1 KB · Views: 449
  • IMG_0454.JPG
    IMG_0454.JPG
    256.4 KB · Views: 332
  • IMG_0457.JPG
    IMG_0457.JPG
    161.2 KB · Views: 354
That’s awesome Dave. Even better than the last one.


Sent from my iPhone using SuperCub.Org
 
Really nice! Where did you get the SuperCub decal or vinyl on the cowl?
 
Make sure you remove that interior by fuel system before fueling it up so you can fix the leaks before you ruin the paint. There’s always leaks.....


Sent from my iPhone using SuperCub.Org
 
Quick update, getting closer. Need a prop so I just emailed Catto, they say they're working on it but not very close. Looks like a it will be a Borer.Wings On.jpgIMG_0482.JPG
 

Attachments

  • Wings On.jpg
    Wings On.jpg
    103.7 KB · Views: 248
  • IMG_0482.JPG
    IMG_0482.JPG
    82 KB · Views: 223
Just to close out this thread. N1938A received it's airworthiness certificate on Monday the 7th through a DAR from the Hartford FISDO. Lots of paperwork was exchanged ahead of time through email and most of his research was done when he came to do the inspection. After a close inspection of the aircraft and paperwork, including the 26 STC's and 337's, log books, Flight manual, AD research he handed me the new airworthiness cert.
I did some ground runs and leak checks and yesterday did the first flight. She flew beautiful, quick take off, lots of pull, flew over the field for 1.2 hrs at high power to break in the cylinders. Really happy that she flew hands off and real smooth, every system worked as it should. Love the CGR 30P, getting used to the 796 and Trig units. More nose down trim needed than I expected, I'll have to investigate that. Weight came in at 1167.
Thanks to everyone that helped along the way - Jim, Bill, Tom, Steve and others, you know who you are.IMG_0019.jpgIMG_0021.jpgIMG_0027.jpgIMG_0025.jpg
 

Attachments

  • IMG_0019.jpg
    IMG_0019.jpg
    234.6 KB · Views: 264
  • IMG_0021.jpg
    IMG_0021.jpg
    250 KB · Views: 242
  • IMG_0027.jpg
    IMG_0027.jpg
    230.1 KB · Views: 229
  • IMG_0025.jpg
    IMG_0025.jpg
    238.4 KB · Views: 296
Very nice! Congratulations, and thanks for sharing some of your build process here!

sj
 
Back
Top