• If You Are Having Trouble Logging In with Your Old Username and Password, Please use this Forgot Your Password link to get re-established.
  • Hey! Be sure to login or register!

J-4 project-3.14159265359

Stringer standoffs.
Where the stringer is distanced from the structure I am making up some pretty simple standoffs. I have both a first and second generation to show here. At first I formed this two piece part.
IMG_6014.JPG IMG_6015.JPG
This is a weldment of a saddle on a pedestal. This has been in place a year or so.

Recently I have formed what to me are much simpler standoffs.
IMG_6016.JPG IMG_6019.JPG
These are formed from some very light mild steel rectangle tube. I have had some of this tube in short lengths for a few decades. I have used it sparingly since I had no viable source for it.
But now I have hundreds of feet of this tube available. For going on five years I have been President of an EAA chapter. Good workers are very hard to come by here. With the many events I host a year I came to realize not many people have a clue how to tie down a canopy. No you do not tie it mid way along a side. And no you do not peg down the bottom of the legs.
So I have been buying two to three canopies a year. Now I know where this thin wall tube is sourced, it is a 10mm X 20MM by about a half mm wall tube. That works out to about 3/8 X 3/4- .020 wall. Now I have an endless supply of light structural support tubing.
One trait I like about these standoffs is you can form them to mechanically grip the round tube. These will work fine for either Aluminum or composite stringer tubes. Once they are painted and the tube bonded in place there should be little chance of electrolysis.

One other tidbit, I will be running my wires to the tail within the conduit. Heck that is what it was made for.
 

Attachments

  • IMG_6014.JPG
    IMG_6014.JPG
    220.6 KB · Views: 151
  • IMG_6015.JPG
    IMG_6015.JPG
    190.1 KB · Views: 147
  • IMG_6016.JPG
    IMG_6016.JPG
    219.4 KB · Views: 141
  • IMG_6019.JPG
    IMG_6019.JPG
    246.2 KB · Views: 152
Humm, been awhile since posting here, I have done a fair bit of work but the posting of such might appear repetitive, might as well put something up though.
I have the front and lower port side D window mounting strips in place. These are made from stainless to reduce the chance of damage from water collection, might reduce how well the fabric adheres as well?
I am using a CNC cut Masonite template to represent the Polycarbonate window. The D windows are curved as are the door windows so the forming of the windows and retainers are a bit more labor intensive. This will be worth it in the end.
IMG_6088.JPG IMG_6089.JPG

IMG_6090.JPG IMG_6092.JPG
 

Attachments

  • IMG_6088.JPG
    IMG_6088.JPG
    248.9 KB · Views: 147
  • IMG_6089.JPG
    IMG_6089.JPG
    233.8 KB · Views: 156
  • IMG_6090.JPG
    IMG_6090.JPG
    266.5 KB · Views: 152
  • IMG_6092.JPG
    IMG_6092.JPG
    241.7 KB · Views: 159
whats happening charlie?
Sad to say my project has been sitting, still in the shop but the past few months I have been flat out on other things. Such as today or tomorrow weather permitting I will be pumping 4800 gallons of water from our pond back into my heating system after some restoration work to the transfer coils. It will be nice to get our heat system fired up again, would be kind of nice to have heat a few of the mornings recently.
But then the sad thing is I need that shop space for a road vehicle project for a few months, as such the fuselage will be going down to the garage for awhile. Sad part is this vehicle has eaten into the wing material funds which might be an issue for the short term.
 
whew:lol: i was worried i was missing something. can tell its fall, over here the highway construction cones are gradually disappearing.
 
Sad to say my project has been sitting, still in the shop but the past few months I have been flat out on other things. Such as today or tomorrow weather permitting I will be pumping 4800 gallons of water from our pond back into my heating system after some restoration work to the transfer coils. It will be nice to get our heat system fired up again, would be kind of nice to have heat a few of the mornings recently.
But then the sad thing is I need that shop space for a road vehicle project for a few months, as such the fuselage will be going down to the garage for awhile. Sad part is this vehicle has eaten into the wing material funds which might be an issue for the short term.

everything you just listed as sad seems to be a part in almost everyone's build, same thing happened to me I went from decent progress every week to not 1 hour of progress in my build log book from may 11 to sept 27, luckily I'm back at it now after a summer of also being flat out at other things. and I hope to see you back at it soon to charlie, your build has been an inspiration for me building my pa14 so you being ahead lets me copy some ideas haha.
 
everything you just listed as sad seems to be a part in almost everyone's build, same thing happened to me I went from decent progress every week to not 1 hour of progress in my build log book from may 11 to sept 27, luckily I'm back at it now after a summer of also being flat out at other things. and I hope to see you back at it soon to charlie, your build has been an inspiration for me building my pa14 so you being ahead lets me copy some ideas haha.

Same here. Weird year for sure. I've been busier than ever despite to supposed slow-down.

I've learned a lot from CharlieN.
 
I at least have our heat system for the house ready. We ran the boiler for a few days and are shut down waiting for the cold. Yesterday we confirmed the French made temp sensors are quite inaccurate which explains why I have had two overheats of the system not to mention time needed to research what tie wraps to use in hot water. I sure hope these $110 a bundle ones will hold up.

I got a small bit of customer work done, dredged the well, our well is knee deep and over the past decade silt migrated in. New top cover is in process. Allot of needed work on road vehicles. Heck I am putting up a 30 foot tall pole with a windsock on it, Next week.

But I am in the middle of a driveline swap in a road vehicle. At this time I am 200 hrs into a 350+ hour wire harness. I hope in a week or so to start fitting the driveline into the chassis but I do have two or 3 months of work till it can be test driven. It will be nice to have a tow vehicle again. I have not gotten the fuselage out of the shop, I just might get something done before it goes into another building for storage.
Then with these projects behind and nothing around here breaks and if there is not an unseen honey do list I can play with the plane again.
 
As I am packing my bags days ahead of traveling to Oshkosh for a long week I truly wish I could have allot more done with my plane. Late last year I expected I would be starting the wings by now but another project that has turned out to be immense has dug into my time and resources. Best I can tell that one may just be a few months more work, granted it might take 4-5 months to achieve that goal.
 
Oh a few more months have snuck by with no progress here. Last I wrote I was getting ready for KOSH. That trip was a mix of frustration and fun. Started with a few days in Madison preparing for the Mooney Caravan into OSH. We were delayed a day due to weather and I had run out of clean clothes and meds in the hotel room and chose to bring my whole bag of stuff from the plane. But living with only one good leg and one usable arm that was the wrong thing to have tried. I pretty much lost the use of my right leg and the pain was debilitating all week. That did not do me well at Kosh where I average over 35 miles of walking. Thank golly for the trams. At least my right seat ride in and the many photos I got with the formation were a treat.
I was right there when Mike Patey arrived. Nice to watch the video of him answering the question I asked, to bad I got no air time. Oh well.
Late in the week I got to spend some time with Marty about the Stewart system. Dang you know your stuff and your career as a teacher has honed your skills for how to share your knowledge. Thank you.

At this time I am yearning to get going again on this project. The vehicle I am building is immensely time consuming. Why does everything I own have to be custom built. Humm. Well I would not ge building this plane then.
The past few days I have been staring at the fuselage. I am resurrecting our EAA Chapters Leaf Peeper flyin breakfast on Oct 9th. I have a great chef to run the whole show greatly reducing my wife and my workload. So maybe I should load my fuselage up and bring it to the airport for a day for people to see. Need to watch the weather since this is all bare steel with not every joint finish welded. We will see.
 
Sounds like you’ve had a full summer. The project is waiting for winter, I think. Hope your shop is warm. ;)


Sent from my iPhone using SuperCub.Org
 
Up, this shop is under the living room which has it's pluses and minuses. It is 32X45 with radiant heat in the living room floor above. The shop is cool in the summer and warm in the winter unless it is really sunny out. The living room has 54' of floor to ceiling of old Andersen windows on the east and southern walls. So the heat runs all night and turns off all day. Well the occasional sun. If I were a night owl I would be real comfy.
This winter I am scheduled to build a replacement fuselage for an early plane which will keep me busy so that will be another few month delay. It is an easy structure though.

My shop has a good supply of compressed air and 3 phase power and the LED lighting is getting better all the time. Now it just needs someone with some cleaning genes, not just creative genes.

I'd really like to see that setup. Someday....

I need those cleaning genes too. My workspace is only 24 X 24 and my boat takes up almost half. I keep meaning to build a lean-to shelter for it, but everything else gets priority, it seems.
 
My boats are stuck outdoors, one very well covered, one less so but it is not a rigged out runner at this time.
I have a few other buildings, a lower shop as we call it where I do the stinky/smokey stuff. The air compressor and big Mig welder is in that one. Then an out building that is storage, has one of my planes hanging from the rafters and a couple of non common cars in it. Then the Long EZ stored up in the field.
My biggest problem with cleaning shop is two fold, I live with pain. When I finish a task I am back upstairs to relax, not doing the cleanup. Then I keep up a drive to move forward, next session starts and I remain productive, well till it is time to relax the pain out.
It was all good when I used to hire, but there has not been one guy worth hiring in this region in over a decade.
 
Being frustrated with the project I am on that is passing 15 months with 3 or 4 to go, I repositioned the fuselage of my J4 build where it is stored and am now able to pick away at it. Yesterday finalized the D windows will be a Dee, I gave thought to squaring the rear of them which would look more Aeronca style but it really did not provide more over the shoulder vision and is just not what I want. These windows are rather large on my plane as is.
Today I drilled the fastener holes along the center strip for the top glass and soon discovered my drill jigs for the nut plates are either in hiding or found someone else's tool box to live in. Ordered in what tools I need so I will get back to that in a week.
Just the center strip has some more hours to put into it, it gets a lower cover which will be slotted for the trim indicator to slide in. The detail design work still has to be done.
I also want to finalize the flap handle and all the mechanism. Over the past few years I have lost most of the use of my right arm & wrist as far as reaching over my head. Thankfully this is a side by side so I can fly from the right allowing my left arm to pull the flaps. My expectation is these flaps will be somewhat limiting as to how much one pulls at speed.
The flap actuation is all hard link, a pushrod back from the handle and torque tube out each wing. I wanted to build the torque tubes in Titanium but the money is gone for that.
I will also be moving forward with the control pedals, I have been hands on the system and I like what I am building, so I will be moving forward on the parts.
 
A few pics,
IMG_9440.JPG IMG_9441.JPG IMG_9442.JPG
 

Attachments

  • IMG_9440.JPG
    IMG_9440.JPG
    222.3 KB · Views: 94
  • IMG_9441.JPG
    IMG_9441.JPG
    249.5 KB · Views: 95
  • IMG_9442.JPG
    IMG_9442.JPG
    232.4 KB · Views: 95
The past few days I made the 304 Stl forward and lower retainer strips for the right side Dee window, This morning I have welded the strips in place.
I expect the rear and upper formed window frame will be made from 1018 sheet stock. I do not expect the need for corrosion resistance as the lower will need being this plane will be stored outdoors.
The tubing in this area will also be painted with a heavier industrial barrier paint.
In this build there will be no tubes with any cavities that will allow moisture to collect knowing during my time this plane will live outdoors.
IMG_9448.JPG IMG_9462.JPG
 

Attachments

  • IMG_9448.JPG
    IMG_9448.JPG
    267.1 KB · Views: 77
  • IMG_9462.JPG
    IMG_9462.JPG
    240.3 KB · Views: 91
Did you weld the stainless to the 4130? That is something new to me.

BTW, I always get a smile looking at that flap mock-up.
 
This may be just a little thing, I kind of wanted to slim down the lower retainer strip on these windows. Got to the point I was realizing the bottom strip will be a quarter inch above the door window. I do not want that. I had even marked the cutline on the left side before welding these right side strips in place. So last night, I closed out my session by cutting then dressing these. I like the detail change and having a radius at the front corner although I regret using hand shears with their resulting distortions. If I can not dress the edge better such that the distortion will not show once covered I can simply replace that strip with one that is properly sheared.
IMG_9469.JPG IMG_9470.JPG
 

Attachments

  • IMG_9469.JPG
    IMG_9469.JPG
    202.6 KB · Views: 71
  • IMG_9470.JPG
    IMG_9470.JPG
    178 KB · Views: 70
Charlie, You need one of these. It makes nice clean cuts right through the middle of a sheet without distortion.

20220116_101254.jpg
 

Attachments

  • 20220116_101254.jpg
    20220116_101254.jpg
    73 KB · Views: 106
I used to own a set, someone decided they wanted them. I should get a new one since I will have a whole lot of trimming once the wings get started which will hopefully be later this year.
I do have much better shears than the two styles of Wiss shears I used, I just stupidly was impatient.
 
The ripples I put in the lower window frame, careful work with pliers essentially takes them out. Essentially like using fluting pliers pressing the high part back down. I expect once the fabric is bedded into the adhesive this will be a non-issue.

As I am working in this area I want to get a set of flaps mocked up. As such my intention has been to buy some 1X8 and 1X6 lumber to mock up my wing structure in wood and later build the metal structure.
I am as of last night thinking to go right into building the real thing. I have a sweet 4' finger brake and an 8' straight brake that has perfect working surfaces. But just down the road is a young metal shop that we trade tasks. He has CNC plasma cutting table and two fresh rebuilt 10' press-brakes.
Tool choice is making 10 flaps to be logical. The design is to have drooping ailerons as well.
As such my wingspar web, I am intending to make an inner 10' and then outer web to the final length I settle on. This allows for the full wing strut structure to be built as well. I will have wet wings for my fuel load and I will not be rushed through that process.

My design is to have removable outer 4' wing sections which would really allow me to slow down but run shorter wings for general use. Even with a 28' span and my flap system I doubt I will be very restricted to where I play. My thoughts are 32' if I built the longer main wings, that would be 40' If I did the full extensions. Probably get beat up pretty bad but could get in and out of tiny places.
 
Rear of Dee,
I started with a cookie box to make my template,
IMG_9477.JPG

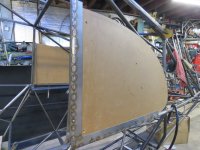
I laid the outline of the tube structure onto a sheet of 0.030 Galvanized steel. Then laid a side window to match the outline and eyed where the inner cut needed to be. Plugged in the Bosch electric shears and cut the frame out. A few bends on the brake and two vice grips and here is what I have.
IMG_9486.JPG

Not sure if the upper forward section will be formed in steel or be integral to the composite fairing up to the flaps.

Oh, on this side the rear edge has a seal area for the upper baggage door.
 

Attachments

  • IMG_9477.JPG
    IMG_9477.JPG
    182.2 KB · Views: 62
  • IMG_9486.JPG
    IMG_9486.JPG
    201.5 KB · Views: 54
And the left side, no upper door here but there will be a stringer terminating up near the top of this piece.
IMG_9490.JPG IMG_9488.JPG IMG_9487.JPG
 

Attachments

  • IMG_9490.JPG
    IMG_9490.JPG
    218.8 KB · Views: 50
  • IMG_9488.JPG
    IMG_9488.JPG
    194.4 KB · Views: 52
  • IMG_9487.JPG
    IMG_9487.JPG
    211.9 KB · Views: 51
A bit more done on dee windows. I decided I will utilize the same sheetmetal on the inside support at least on the aft portion. So I laid out what I think I wanted, trial fit them and went ahead with the initial welds, I think I like it. I will get back to it next week since I am flying out tomorrow to meet up with a few of my race car customers from a few decades back. Unless it does snow.
IMG_9502.JPG IMG_9504.JPG IMG_9506.JPG
 

Attachments

  • IMG_9502.JPG
    IMG_9502.JPG
    263.7 KB · Views: 46
  • IMG_9504.JPG
    IMG_9504.JPG
    231.6 KB · Views: 49
  • IMG_9506.JPG
    IMG_9506.JPG
    214.8 KB · Views: 45
The US tools ones have a variety of sizes but I do not see a choice of L&R.
 
Back
Top