• If You Are Having Trouble Logging In with Your Old Username and Password, Please use this Forgot Your Password link to get re-established.
  • Hey! Be sure to login or register!

Trim handle

Hyway

MEMBER
Sydney Australia
Hi Guys taxied out yesterday and in the run up bay the trim handle came off in my hand, taxied back in and looked on the floor for the parts, it consisted of a spring a cover plate and a very small pin. Found them all and reassembled after 10 minutes took off all went well.
my question is the pin took me 3 goes to get it in, it went straight through the holes in the handle, what holds the pin in place? Is it the cover plate and spring? I would of thought it would of been some kind of fastener instead of a pin same size from top to bottom.
it was a 1956 Piper SuperCub
Mat
 
Matt

That pin is supposed to be a "roll pin". It should have a slit in it and be slightly beveled on the ends. It is compressed as you tap it in and held in place by friction.

Here is a picture.....

images4.jpg


Hope this helps


Bill

Thanks ...... Pete, I sit corrected. It was NOT originally a roll pin but perhaps that would be an option.
 
Last edited:
The original is a straight pin which is held in place by the cover plate being held out against the handle by the spring. The cover plate covers both ends of the hole thus holding the pin in place.
 
I never liked that design. A spring & escutcheon plate to hold a pin in? Come on ... and on top of that they eat up the square aluminum plate that has the trim lettering on it.
Solution: Throw the spring & escutcheon plate in the dumpster. replace them with a tube spacer over the shaft then reinstall the handle with a #4 bolt & nut. Has worked for me the last 400 hrs.

attachment.php

attachment.php

And if you get deeper into it, install F520-15 Oilite bearings between the shaft and the two thin fuselage tabs as shown in the drawing.
 

Attachments

  • IMG_5730.jpg
    IMG_5730.jpg
    13.1 KB · Views: 1,729
  • P6190001 cropped.jpg
    P6190001 cropped.jpg
    593.6 KB · Views: 1,955
Thanks guys for all your replies.
I was also surprised at the simplistic design but not that fool proof, I think I will remove the pin and get it replaced with something that won't vibrate out or fall out if you push the cover plate in too far.
once again thanks for the info
Mat
 
G'day Darrel. Looks over engineered which is right up my alley. The Oilite bearing is the one coloured red?
What process did you use on the walls? Fabric glued onto what sized aluminium wall?
The photo doesn't show the number 4 bolt. But wouldn't a roll pin look better?
Regards, Denis.
 
It is always nice to develop a better mouse trap. I understand that desire. I do it myself. Remember that when Piper designed these planes all of the automobiles had crank up windows. Remember those? It was very easy for Piper to send the stock boy to the local auto dealer to buy a box of window cranks, which is what was done. These planes were designed using the KISS principle. If you don't want the paint scratched just glue on a thin piece of anti chaffing materiel between the escutcheon and the plate.
 
The escutcheon I linked works great. Has enough pressure that it takes some doing to push it out of the way to get the pin in and out. It also does not rotate when you turn the crank since it has a has pressure and a nylon bushing to rotate on. Dakota Cub sales a sure shaft handle with a screw retaining the handle.
 
I never liked that design. A spring & escutcheon plate to hold a pin in? Come on ... and on top of that they eat up the square aluminum plate that has the trim lettering on it.
Solution: Throw the spring & escutcheon plate in the dumpster. replace them with a tube spacer over the shaft then reinstall the handle with a #4 bolt & nut. Has worked for me the last 400 hrs.

attachment.php

attachment.php

And if you get deeper into it, install F520-15 Oilite bearings between the shaft and the two thin fuselage tabs as shown in the drawing.

Darrel, i think this is a excellant fix, even before, after the brackets holes start getting sloppy.
 
Texmex, the Oilite bearings are green in the picture located in the yellow brackets welded to the fuselage. Yes the fabric is glued to the side panels. The fabric is from Oregon Aero and matches the seats. The #4 bolt has an Allen head and is shown in the photo showing the fabric. The bearings allow the crank to turn much more smoothly than the original design of a steel pin turning in thin steel brackets which is never a good idea.
 
Texmex, the Oilite bearings are green in the picture located in the yellow brackets welded to the fuselage. Yes the fabric is glued to the side panels. The fabric is from Oregon Aero and matches the seats. The #4 bolt has an Allen head and is shown in the photo showing the fabric. The bearings allow the crank to turn much more smoothly than the original design of a steel pin turning in thin steel brackets which is never a good idea.

Great design and thanks for sharing it Darrel :) I'm ordering the Oilite flanged bearings now and doing the mod as well :) Question; did you have to make up a new crank handle axle, as the additional thickness of the bearing flange would have presumably moved the position of the pulley locking pin hole to a point where it couldn't be used, or did you drill a new locking pin hole in the original axle, or deepen the groove in the pulley to pick up the original hole?

And on the Oilite bearings, did you:

Machine the Oilite bearings length down to match the metal mountings' thickness
Put spacers on the outside of the metal mountings to the Oilite flange
Just leave the length and let them ride on the pulley?

Cheers and thanks

Philly
 
Last edited:
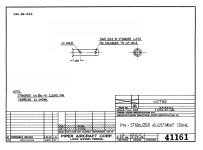
The original Piper crank pin was just a modified 3/8" clevis pin (AN396-41 Length:1-9/32").

Darrel has used a longer one (AN396-59 Length: 1-19/32") to accomodate the Oilite bearings and drilled a new pulley pin hole at the right spot and also allow the fixing of the crank handle with the #4 nut and bolt as opposed to the pin/spring/escutcheon arrangement.
 

Attachments

  • 41161_Pin-Stabilizer Adjustment Crank.jpg
    41161_Pin-Stabilizer Adjustment Crank.jpg
    198.9 KB · Views: 213
Last edited:
When you use the Oilite bearings for this do you use locktite to stop them spinning in the bracket or does it not matter?
 
The escutcheon and spring keep the pin from coming out. Check your handle to see if the hole is wallowed out. I found an improved escutcheon that has the spring made into it and a nylon bushing for better wear. http://www.snydersantiqueauto.com/window-crank-escutcheon-spring-loaded

This one has the nylon
https://www.mikes-afordable.com/product/A48139RE.html

https://www.snydersantiqueauto.com/ProductDetail/a-48139-re_window-escutcheon-spring-loaded
If you want to pay more through amazon. The last ones i ordered showed up in grand general packaging
https://www.amazon.com/GG-Grand-General-54990-Peterbilt/dp/B085GHJ6KL

Handle pn a702780A
https://www.modelaparts.com/a702780a
 
I always carried a small needle nose vise grip pliers clipped under the seat in case the trim handle or fuel valve handle ever fell off. A million uses and used them often but never lost a trim handle or a fuel valve handle.
 
Good point for annual insp - fuel valve screws tight! Thanks for the reminder - - -

just a dab of thread locker does wonders. I always get the blue stuff. I don’t know about the other colors but the blue I can get off when I want to yet I’ve never had a tread come loose with it on
 
just a dab of thread locker does wonders. I always get the blue stuff. I don’t know about the other colors but the blue I can get off when I want to yet I’ve never had a tread come loose with it on
Blue is the softest of the Lock-Tites and a good choice for small machine screws. Red is next and green is for all of time. Red on a smaller screw usually requires heat to remove without breaking the screw unless you apply heat. On a fuel valve that might be questionable.....
 
Blue is actually considered a 'medium' hold. There are others such as purple that are less tenacious.

Web
 
Back
Top