You are using an out of date browser. It may not display this or other websites correctly.
You should upgrade or use an alternative browser.
You should upgrade or use an alternative browser.
Wildcat Cub
- Thread starter stewartb
- Start date
Dave Calkins
Registered User
Anchorage, Alaska
all that beautiful work and then wiring simply tyrapped to the frame in the belly where it will chafe and maybe even touch fabric?
I expect to see a photo with that stuff properly secured soon??!!
sorry. someone had to see that and say something!
I expect to see a photo with that stuff properly secured soon??!!
sorry. someone had to see that and say something!
WanaBNACub
Registered User
Off Airport
Running out of parts is a good problem to have! Running out of problems is even better!
The kit was ordered with 108" Keller flaps. Mine have been extended a couple of inches inboard to the fuselage. Target full flap deployment is 70*. My flap cable is looped like a Cessna so I have positive flap control up and down. When up they're locked up, not held by a spring. Big, split flaps with long extension present some control challenges.
The kit was ordered with 108" Keller flaps. Mine have been extended a couple of inches inboard to the fuselage. Target full flap deployment is 70*. My flap cable is looped like a Cessna so I have positive flap control up and down. When up they're locked up, not held by a spring. Big, split flaps with long extension present some control challenges.
Aktahoe discussed issues with his Keller flaps in the thread; Keller Performance Flap Needing more tension Somehow?? Does your revised cable system address these issues? Is that a factory(Backcountry fix) or yours? thanks
[h=1][/h]
You can read some of my comments in that thread. The flap control issues were apparent very early in my build so we did what we could to improve on the system. Since then I have heard from Backcountry and they have changed their bell crank to relieve some of the cable tension. I believe they were reacting to pulley attach fatigue issues. My pulley mounts were reinforced early on to eliminate flex.
A couple of head scratchers with the BCSC Rev 2 are the pulley sticking down below the belly (I think you SQ2 guys have the same?) and the routing/angle of the rudder cable out of the fuselage. Mike does what Mike does. Make up some dies and press some inspection covers to suit. Nice!
Attachments
Gordon Misch
MEMBER
Toledo, Wa (KTDO)
Use your imagination, with Mike's work for inspiration, and say "I can".What do you do if you don't have a "Mike"
mike mcs repair
Registered User
chugiak AK
What do you do if you don't have a "Mike"
youtube. Hours on treadmill watching how to videos each night. With beer....
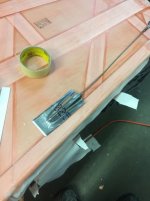
Back to NoCub's question in post #100.... Change in direction. I was going to use a manual indicator to monitor actual flap deployment in-flight but will use this cool little string potentiometer to display accurate flap position on the G3X display. This is the same position indicator that my trim actuator uses, by the way.
Attachments
Dave Calkins
Registered User
Anchorage, Alaska
right on!!
i love those kindof pictures of before paint and then masked with paint on. then finished
keep her movin!!
i love those kindof pictures of before paint and then masked with paint on. then finished
keep her movin!!
Gordon Misch
MEMBER
Toledo, Wa (KTDO)
What fabric system are you using Stewart? Nice looking workmanship, regardless.
RVBottomly
PATRON
Asotin County Washington (KLWS)
Looking good, Stewart!!!
I agree. Real nice work there.
B
Barnstormer
mike mcs repair
Registered User
chugiak AK
I'm loving the whole blue & orange thing. Now you just need some lime green pinstriping.
(Okay so this was ten years ago and I was 70lbs lighter-I'm working on it)
View attachment 33689
me too... I wish he'd change the gray to the last minor choice/orange to major accent color... but it's his plane...
order any color you want, deliver black...(orange?)
My website has been turned off. I’m too busy to keep it updated. I will add a few pics here as the project is nearing the end. If anyone is interested in a complete picture diary I’ll create one in Google Pics and will be happy to answer questions.
The nose bowl was a prototype from HO Aircraft’s King Cub STC development. It’s been much modified and reinforced but is still a prototype. If it works out as planned I’ll commission Carbon Concepts to use it as a plug to build a mold for a carbon fiber replacement. The dual oil coolers are installed in series on custom made wedge gaskets to provide clearance. Outlet ducts will provide control of oil temp from the panel. The cub-style cowl is one of my favorite parts of the project. My Rev 2 will not look like it’s cousins.


Sent from my iPad using SuperCub.Org mobile app
The nose bowl was a prototype from HO Aircraft’s King Cub STC development. It’s been much modified and reinforced but is still a prototype. If it works out as planned I’ll commission Carbon Concepts to use it as a plug to build a mold for a carbon fiber replacement. The dual oil coolers are installed in series on custom made wedge gaskets to provide clearance. Outlet ducts will provide control of oil temp from the panel. The cub-style cowl is one of my favorite parts of the project. My Rev 2 will not look like it’s cousins.


Sent from my iPad using SuperCub.Org mobile app
B
Barnstormer
That is a super awesome idea!...Outlet ducts will provide control of oil temp from the panel...
Similar threads
- Replies
- 176
- Views
- 141K
- Replies
- 4
- Views
- 3K
- Replies
- 104
- Views
- 86K


