• If You Are Having Trouble Logging In with Your Old Username and Password, Please use this Forgot Your Password link to get re-established.
  • Hey! Be sure to login or register!

New member building a PA18-95

Epoxy primer

Has anyone just used a good epoxy primer for both the exposed and unexposed steel parts? What I mean is primed is done as far as a finished color. Fuse with no interior, internal steel wing parts, gear, hangers, hinges, everything. I'm not building a show plane. I'm assuming the self etching epoxy primers dry in a flat gloss. Flat hides a lot of imperfections and is easy to touch up. I don't want to build something disposable, but if it will keep the steel from rusting for a reasonable amount of time and keep it light, that's all I am after. I like the thought of primer and done. I can likely spray primer on and not screw it up. Maybe the right thing to do is to buy what I'm going to use everywhere else so everything is the same color when I get to the bigger steel items.

By the way, I just noticed how to thank people who give me advice on this wonderful spot by clicking a button. I read and appreciate it all. Forum stuff is new to me. I haven't wanted to ramble, but I don't want to say too little either.

Thanks again,

Jim

This is just what I have been told always that primer is primer that you need a top coat to seal it. Primer is pouris and it will let moisture in. I would check with the manufacture on the product you want to use to get the answer you really looking for. I will be blasting mine this spring and using a ppg primer and randthane top coat.
 
Good advice to check with the manufacturer, but I'd expect they'll tell you to top coat - why wouldn't they. From experience though, Epoxy primer (PPG DP, Polyfiber EP420) will hold up on properly prepared steel with no top coat in non UV affected areas. EP420 comes in green for that vintage look. However, all the work is in preparing the steel for primer, a light coat of topcoat is easy at that point and good peace of mind.
 
I blasted and wiped down with alcohol then shot Stewart's Ecopoxy primer. It is tough and a lot of my parts won't see paint if inside. It would be much better if it were available in a rattle can...it's nice not to have any fumes or nasty stuff to deal with.
 
Made some mistakes

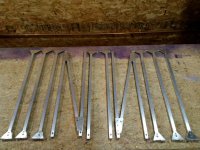
I get to do some version 2.0 work. I ruined my drag tubes by puckering the feet/tube with annealed AD rivets. Also wrecked the N braces. Probably for the best, the wall thickness on my 3/4" tube is likely too light from a buckling standpoint. Not going to chance it. I plan to blind rivet the feet and N brace gussets on this time. Can someone please suggest a suitable blind rivet for this task? I'd rather not buy a Cherry rivet tool if I don't need to, but maybe I'll be using the style rivets that require the tool when I start sliding on and attaching stuff to my spars. I can still use annealed AD rivets where my plugs go in the ends of the tubes, didn't have issues there. Part of me wants to cut some 6061 bar stock that fits the ID of my replacement tubing 1/2" long, TIG weld it in the ends, drill and tap a hole and be done. The plugs are heavy, time consuming, and seem a little cumbersome for what I think they do.

Also learned all about paying attention to bend radius with 4130N. Of course I learned the lesson the hard way while bending the 48th of 52 tiny but important parts. All got wiped into the trash. I made the necessary changes to my brake by blunting the nose and adjusting the setback. I also switched to 4130 in the annealed state. Not as strong as in the normalized state, but it works lots easier and the brittleness of normalized when you screw up and bend it too tight scared me.

I know this sounds like I'm down in the dumps, but I'm not. My mistakes cost me some time and not a whole lot of money. My kids and I are having fun. I'm also looking way too far ahead about what to build next. The Thorp S/T-18 looks like an interesting exact opposite that should fit nicely in a T-hanger with a Cub.

I know, focus, one step at a time.

Thanks,

Jim
 
Drag Struts

Jim,

Picture of my home-made drag strut attached. Used AN3 bolts, just like Dakota Cub. The "refined" version (sorry no picture) uses 5/32" cherry rivets at the inboard locations. The outboard fasteners capture the plug and the inboard just the foot and the tube. Tube size is 7/8 x .065.

I hope this helps.

Andrew.
 

Attachments

  • IMG_2402.jpeg
    IMG_2402.jpeg
    247.5 KB · Views: 204
Drag struts

Here you go Jim.

Aluminium washer and little nut for weight savings. 5/32 Cherry rivet. The cherries can be pulled with an ordinary pop-rivet plier.

Andrew.
 

Attachments

  • IMG_3104.jpeg
    IMG_3104.jpeg
    238.8 KB · Views: 145
Some Keeper parts

IMG_20150307_195518.jpgIMG_20150408_234054.jpgIMG_20150408_234154.jpgIMG_20150408_234216.jpgIMG_20150408_234240.jpgIMG_20150408_234510.jpgIMG_20150408_234835.jpgIMG_20150409_001316.jpgIMG_20150409_001439.jpgIMG_20150412_203616.jpgIMG_20150412_203335.jpg
IMG_20150412_202658.jpgIMG_20150412_205035.jpgIMG_20150307_200643.jpgIMG_20150412_205828.jpgIMG_20150412_205757.jpg

First picture is of blanks we started with. These were scrapped, but you get the idea.

Next 10 pictures are of making the clevises. These clevises took some monkey-business. Ended up making a former out of 1/2" key stock to get them to lay flat where the square washer goes. With a proper bend radius in my brake, they were too rounded for the washer to lay flat in them. Payed close attention to not mashing the corner tight with the former. The clevises originally were originally .045. I had hoped to use .040 4130 in the normalized state, but ended up using annealed in .050. Drag wires and nipples came from Javron. Nice stuff. Worth the call. I looked into making them myself, but the problem is the rolled thread versus a cut thread. These will be light like the original ones and I won't question their worthiness.

The next picture is of the clevises, drag pulls (.063), square washers, and stainless retainers for the drag tube bolts we made. The retainers may not make the wing, safety wire through the bolt and spar stiffener Al angle looks to be simpler and lighter. Either way, they are there if I decide to use them. The picture on the right of this one is a different view of the same parts in a container (lots of satisfaction, lots of parts that fit in two very small containers).

The last three pictures deal with righting mistake #2. The kids can play with these on the ground. They are not going in the airplane. You can see that I dimpled the feet where the plug isn't. We're still going to use an annealed AD rivet to hold the plug, The first picture is a view from the back side, it looks almost OK to me, but blind rivets will go everywhere else. Our new tubing is a thicker wall, (version 1.0 was too thin), and the plugs will press fit tighter on the ID. Hope to have pictures of new drag tubes, N braces by next Sunday.

Thanks for the help,

Jim
 

Attachments

  • IMG_20150408_234216.jpg
    IMG_20150408_234216.jpg
    1.4 MB · Views: 147
  • IMG_20150408_234510.jpg
    IMG_20150408_234510.jpg
    1.4 MB · Views: 185
  • IMG_20150408_234835.jpg
    IMG_20150408_234835.jpg
    1.3 MB · Views: 160
  • IMG_20150409_001316.jpg
    IMG_20150409_001316.jpg
    1.8 MB · Views: 156
  • IMG_20150409_001439.jpg
    IMG_20150409_001439.jpg
    1.2 MB · Views: 167
  • IMG_20150412_203616.jpg
    IMG_20150412_203616.jpg
    1.8 MB · Views: 144
  • IMG_20150412_203335.jpg
    IMG_20150412_203335.jpg
    1.7 MB · Views: 165
  • IMG_20150412_202658.jpg
    IMG_20150412_202658.jpg
    1.8 MB · Views: 161
  • IMG_20150412_205035.jpg
    IMG_20150412_205035.jpg
    1.5 MB · Views: 147
  • IMG_20150307_200643.jpg
    IMG_20150307_200643.jpg
    1.6 MB · Views: 171
  • IMG_20150412_205757.jpg
    IMG_20150412_205757.jpg
    1 MB · Views: 162
  • IMG_20150412_205828.jpg
    IMG_20150412_205828.jpg
    925.4 KB · Views: 160
  • IMG_20150307_195518.jpg
    IMG_20150307_195518.jpg
    1.2 MB · Views: 184
  • IMG_20150408_234054.jpg
    IMG_20150408_234054.jpg
    1.5 MB · Views: 168
  • IMG_20150408_234154.jpg
    IMG_20150408_234154.jpg
    1.5 MB · Views: 162
  • IMG_20150408_234240.jpg
    IMG_20150408_234240.jpg
    1.4 MB · Views: 157
These are better

Finished making my drag tubes and N-braces again.
 

Attachments

  • IMG_20150415_231517.jpg
    IMG_20150415_231517.jpg
    1.5 MB · Views: 130
  • IMG_20150418_003520.jpg
    IMG_20150418_003520.jpg
    1.9 MB · Views: 136
  • IMG_20150423_223947.jpg
    IMG_20150423_223947.jpg
    1.5 MB · Views: 130
  • IMG_20150423_224224.jpg
    IMG_20150423_224224.jpg
    1.3 MB · Views: 141
  • IMG_20150423_224028.jpg
    IMG_20150423_224028.jpg
    1.3 MB · Views: 130
  • IMG_20150423_224541.jpg
    IMG_20150423_224541.jpg
    1.2 MB · Views: 130
  • IMG_20150423_224750.jpg
    IMG_20150423_224750.jpg
    1.3 MB · Views: 120
  • IMG_20150423_230759.jpg
    IMG_20150423_230759.jpg
    1.4 MB · Views: 127
  • IMG_20150427_004221.jpg
    IMG_20150427_004221.jpg
    1.8 MB · Views: 147
Recent Pictures

This is what the kids and I have been up to.
 

Attachments

  • IMG_20150510_182142.jpg
    IMG_20150510_182142.jpg
    1.9 MB · Views: 127
  • IMG_20150510_182358.jpg
    IMG_20150510_182358.jpg
    1.5 MB · Views: 109
  • IMG_20150510_184807.jpg
    IMG_20150510_184807.jpg
    1.5 MB · Views: 114
  • IMG_20150510_191722.jpg
    IMG_20150510_191722.jpg
    1.5 MB · Views: 115
  • IMG_20150521_194927.jpg
    IMG_20150521_194927.jpg
    1,022.6 KB · Views: 102
  • IMG_20150521_195039.jpg
    IMG_20150521_195039.jpg
    1,009.9 KB · Views: 94
  • IMG_20150521_203656.jpg
    IMG_20150521_203656.jpg
    1.4 MB · Views: 109
  • IMG_20150521_205842.jpg
    IMG_20150521_205842.jpg
    1.3 MB · Views: 93
  • IMG_20150525_093405.jpg
    IMG_20150525_093405.jpg
    1.4 MB · Views: 94
  • IMG_20150525_092932.jpg
    IMG_20150525_092932.jpg
    1.5 MB · Views: 94
  • IMG_20150525_092608.jpg
    IMG_20150525_092608.jpg
    1.1 MB · Views: 88
  • IMG_20150525_094845.jpg
    IMG_20150525_094845.jpg
    1.5 MB · Views: 97
  • IMG_20150525_164520.jpg
    IMG_20150525_164520.jpg
    1.5 MB · Views: 96
  • IMG_20150525_164253.jpg
    IMG_20150525_164253.jpg
    1.7 MB · Views: 83
  • IMG_20150526_191814.jpg
    IMG_20150526_191814.jpg
    1.5 MB · Views: 74
  • IMG_20150611_175902.jpg
    IMG_20150611_175902.jpg
    1.4 MB · Views: 86
  • IMG_20150611_175822.jpg
    IMG_20150611_175822.jpg
    1.3 MB · Views: 82
  • IMG_20150611_175732.jpg
    IMG_20150611_175732.jpg
    1.4 MB · Views: 85
  • IMG_20150611_175612.jpg
    IMG_20150611_175612.jpg
    1.7 MB · Views: 97
More Pictures

Haven't shared anything in a while. This may be more than what people want to see. Decided to go with Polyfiber EP epoxy primer in white and Polyfiber Mark II top coat for the steel. Paint is not cheap! Hopefully it will last until I'm ready to paint the fuselage. Looking forward to blasting/painting. I did blast a few parts to check my welds, but everything else will stay ugly until I'm ready to paint.
Have a target date of July 10th to go get spars.
On June 1st, I had about 800 hrs and $2500 wrapped up in the wings so far.

Couple of questions: For these small parts, is an airbrush worth using? (never painted with an air sprayer)
I've been welding using a Smith Little torch with a #4,#5 tip and a Victor 100 series torch with a 0 tip. #4,#5 sometimes not hot enough, 0 sometimes too hot. Should I invest in a Victor 00?

Thanks,

Jim
 

Attachments

  • IMG_20150615_202609.jpg
    IMG_20150615_202609.jpg
    1.4 MB · Views: 91
  • IMG_20150615_202720.jpg
    IMG_20150615_202720.jpg
    1.5 MB · Views: 87
  • IMG_20150615_203441.jpg
    IMG_20150615_203441.jpg
    1.6 MB · Views: 86
  • IMG_20150615_205721.jpg
    IMG_20150615_205721.jpg
    1.6 MB · Views: 88
  • IMG_20150615_205756.jpg
    IMG_20150615_205756.jpg
    1.4 MB · Views: 81
  • IMG_20150525_153909.jpg
    IMG_20150525_153909.jpg
    1.7 MB · Views: 77
  • IMG_20150525_154244.jpg
    IMG_20150525_154244.jpg
    1.5 MB · Views: 87
  • IMG_20150525_160454.jpg
    IMG_20150525_160454.jpg
    1.6 MB · Views: 90
  • IMG_20150525_160938.jpg
    IMG_20150525_160938.jpg
    1.5 MB · Views: 90
  • IMG_20150525_155048.jpg
    IMG_20150525_155048.jpg
    1.4 MB · Views: 74
  • IMG_20150525_164309.jpg
    IMG_20150525_164309.jpg
    1.3 MB · Views: 85
  • IMG_20150525_164044.jpg
    IMG_20150525_164044.jpg
    1.3 MB · Views: 96
  • IMG_20150516_165351.jpg
    IMG_20150516_165351.jpg
    1.8 MB · Views: 103
Big kid in the last picture is a buddy of my oldest. At a Young Eagles event we had a few weeks ago, he went up for the first time in the same airplane I took my first ride in when I was a kid. Piper Tri-Pacer. Kinda cool. Some lucky kid got his first ride in the family 172.
Also meant to share that I am working on my IFR rating this summer. Realizing quickly how much room for improvement I have.

Thanks,

Jim
 
Your instrument ticket will teach you many things but most important is you'll be a safer pilot...GOOD on you Jim!!
 
Great progress. Like your pics. I'm not a painter, so when I paint something I want it protected from rust. I use the cheap HVLP gun for about 15 bucks from Harbor Freight aircraft supply. That gun works good for what I'm using it for and even makes me look like I know how to paint. I've been using it with the Poly Fiber epoxy primer.
 
Couple of questions: For these small parts, is an airbrush worth using? (never painted with an air sprayer)
I've been welding using a Smith Little torch with a #4,#5 tip and a Victor 100 series torch with a 0 tip. #4,#5 sometimes not hot enough, 0 sometimes too hot. Should I invest in a Victor 00?

Thanks,

Jim

Jim,

I wouldn't bother with an airbrush. Buy the nicest gun you can afford. If you go with the right size tip (1.3-1.4) you can spray primer up through finish coat. Polyfiber primer is easy to spray and you can dial any gun down to spray a small amount of paint.

MR
 
Aileron Horns

Was going to make these like the Wag Aero plans. They call for using streamline tubing for the horn, welded to the spar stiffener. They looked nice on paper. I made one and wasn't happy with what I had created. Not knocking the design, just not for me. Ended up going original. Stacked the four blanks, tacked together in the corners, bi-metal hole saws very slow with lots of oil drilled the lightening holes.
Cut out a piece of 1/4" steel for a radius curve form block. Thought for sure I'd have to heat the steel for this bend, but tried the last one cold and it worked fine (I'm using annealed 4130). Should have put the compound bend in them before drilling the holes (It egged them and I scrapped one). Came up with a solution and I'm happy with these. The end result is temporarily held together with machine screws and sheet metal screws. After blasting and paint, they will be riveted. Onward.

Thanks,

Jim
 

Attachments

  • IMG_20150622_192644.jpg
    IMG_20150622_192644.jpg
    1.3 MB · Views: 110
  • IMG_20150623_194036.jpg
    IMG_20150623_194036.jpg
    1.3 MB · Views: 101
  • IMG_20150623_194311.jpg
    IMG_20150623_194311.jpg
    1.4 MB · Views: 111
  • IMG_20150623_194332.jpg
    IMG_20150623_194332.jpg
    1.3 MB · Views: 116
  • IMG_20150623_194425.jpg
    IMG_20150623_194425.jpg
    1.4 MB · Views: 92
  • IMG_20150624_205928.jpg
    IMG_20150624_205928.jpg
    1.4 MB · Views: 109
  • IMG_20150706_204636.jpg
    IMG_20150706_204636.jpg
    1.4 MB · Views: 124
Update

I know for sure some ways to really slow down an airplane build. 1) Get your instrument rating. 2) Build a canoe with and for your kid. 3) Tear a daily driver engine down to the block to enable the driving process again.

First two have been fun and necessary, 3rd not so much, but necessary.

Boy and I had never been to BWCA. Needed a canoe, built one. It is now his summer freedom machine.

I passed my written last week. Took it once, barely passed, tough test. Should be finished up with practical and oral within the next few weeks. Been flying twice a week all summer long, haven't looked out of the airplane other than to briefly see if I could land.

Spars have been on the floor in the packaging since I went and got them in August. I'm ready to start putting wings together, but need to get instrument rating done first. Money, time, and not wanting to have to move them to make room for a dead jalopy has kept me from them.

Soon...Counting the days. Here are some pictures none the less.

Thanks,

Jim
 

Attachments

  • IMG_20150712_192813.jpg
    IMG_20150712_192813.jpg
    237.1 KB · Views: 78
  • IMG_20150712_165954.jpg
    IMG_20150712_165954.jpg
    185.4 KB · Views: 75
  • IMG_20150713_171813.jpg
    IMG_20150713_171813.jpg
    227.8 KB · Views: 78
  • IMG_20150718_142148.jpg
    IMG_20150718_142148.jpg
    245.2 KB · Views: 80
  • IMG_20150725_145323.jpg
    IMG_20150725_145323.jpg
    238.3 KB · Views: 85
  • IMG_20150802_170835.jpg
    IMG_20150802_170835.jpg
    264 KB · Views: 71
  • IMG_20150802_170855.jpg
    IMG_20150802_170855.jpg
    254.4 KB · Views: 94
  • 18.jpg
    18.jpg
    103.8 KB · Views: 82
JIM

YOU ROCK!!!

I am so impressed by your build but even more so by your family values. Good on you. Don't get aids (Aviation Induced Divorce Syndrome). Great job on the canoe. The BWCA is a hidden gem that a lot of folks never discover. Too bad for them. It is an awesome place. Thanks for posting and keeping us up on the build, family, and flying.

Bill
 
Doug,

I cut out a piece of 1/4" steel with a radius. Bolted a blank to it and bent the radius flange over with a tinning hammer. I am using annealed 4130, it works nicer. The radius curve was the easy one. For the compound curve, the one closest to the spar, it took two pieces of 1/4" x 1.5" angle trimmed down, welded with the 15 degree or so angle. I sandwiched the blank between the two in the vice and again beat it with a hammer. I should have drilled the lightening holes last. This last operation egged the holes on the first one which I scrapped. To keep from scrapping the other 3, I cut a slit in the corner where the angles meet and welded it shut on both sides once the bend was made. I'm sure that bend could have been made without major issue and welding if I would have drilled the holes last. The last two pictures from a few posts back may tell the tale a little better.
 
Bill,
Thanks for the compliment. You've kind of set the bar for building. Mine won't be nearly as nice when finished. You have provided us all something with lots of detailed pictures to strive for and measure our projects against. I'm not Superdad, nor a master craftsman, just trying to make lasting memories and teach my kids what I can along the way like my dad has done for me (I should have paid closer attention when I was younger). Things move much faster nowadays and we have infinitely more distractions then when I was a kid. It is easy for them to learn about video games, computers, cell phones, and TV. Far harder to be exposed to fishing, camping, hunting, trapping, flying, hard work, and making something useful with your hands.
As far as BWCA, it is one of the few untrampled places on earth I have been to. It's shameful that we haven't been there before now. We will be going back, but alas, we will need more canoes come spring!

Thanks,
Jim
 
Finally got instrument rating, back to building.

Instrument rating finally done on last day of the year. I'm still married, but towards the end, I sensed I needed to be finished ASAP. I love my wife, she is very understanding of my affliction. Getting the rating consumed lots of time and money. It was one of the best things I've ever done. Also happens to be one of the most miserable and terrifying things I've ever done. Learned a lot and feel like I'm better for suffering through it. The miserable part was wearing that damn hood for months. Don't care to ever wear one again. The terrifying part was flying in stuff I know darn well can get you killed. Never super hard IFR, but the temps and moisture in the air that we have had here over the past month reinforce my respect for weather.

Used only the old school stuff in my 172 for instruction. ADF, VOR, ILS. Purposely left the GPS out of the plane. Sounds and is a little backwards with the technology we have available today, but knew if I had GPS in the airplane "for reference only", that would be all that I would truly learn. I likely drove my instructor and examiner crazy.

Had a blustery but clear day last Saturday. Took my three boys up for a quick bumpy trip around the patch. None of the kids have been up with me since I started the training. All is good now. The effort for the rating was worth the while.

Spent some time in the shop tonight before work. Glad to be working on the Cub with my hands again (I never quit working on it with my mind). Kids are also excited that "shop time" has started once again.

I'll have something to show before too long.

Thanks,

Jim
 
Congrats Jim!!! You won't regret getting it done and remember to take care of your wife in a special way!!

Fly safe!!
 
Congratulations Jim, you are now less restricted. Don't forget to maintain your proficiency. It is too easy to let it slide to a point where you would be dangerous to yourself particularly since the ink is still wet on the ticket. Going on your own without the instructor is a big step.
 
Thanks Pete. I plan to incorporate some GPS into the mix now as well. My old radios leave a little to be desired. I will likely never purposely be a serious IFR kind of guy. I agree that getting rusty on what I have learned and then going into the murk would be a bad idea. Going without the instructor is indeed a big step. I haven't gone by myself yet. I've heard that one of the biggest reasons guys lose there proficiency is that they never go up for the first time on there own. I plan to, but I'm going to start on the bunny hill. IFR on VFR days first, then likely marginal VFR at best.

Thanks,

Jim
 
Jim, I was fortunate to have a flying job in which I worked in the IFR system daily for nearly 40 years. As a result, flying IFR was just like walking for me. When I flew my own airplane, I never hesitated to fly IFR if the situation presented itself. However, here is the kicker, during all those years I only accumulated a little over 100 hours of actual instrument time in my own airplanes including my training time. It has been my view that if I had not had that flying job, I would have had no business of attempting to go IFR on my own. Do not let yourself get rusty. Enjoy and fly safe.
 
Congratulations on the new rating. I think you absolutely did the right thing training with the "old" radios. Like Pete I rarely flew my personal airplanes in IFR conditions. With a lifetime of flying in bad wx I'm in no hurry to do it again, part of being retired I guess.
 
Back
Top