• If You Are Having Trouble Logging In with Your Old Username and Password, Please use this Forgot Your Password link to get re-established.
  • Hey! Be sure to login or register!

Greg's Supercub Build

Mike the Crimpers arrived today. I plan to ask our Grady County Supercub crew to come over and we'll roll the Cub out in the yard, put the wings on and rig the flaps the first pretty day after they arrive. I'll get the crimpers back to you soon. Thank you very much for your unprompted kindness. Greg
 
Is this what you are talking about? http://kestrobes.com/AllLED.htm
ledcombo-2.jpg


I have these on my Cub.
Question. I have this set up. I plan to mount my battery on the fire wall and the powers supply just aft of the headliner in the upper baggage. The power supply has 22 gage wire coming out of it. What would be the suggested gage for the 12 volt wire coming from the from power up front to the power supply?
 
Question. I have this set up. I plan to mount my battery on the fire wall and the powers supply just aft of the headliner in the upper baggage. The power supply has 22 gage wire coming out of it. What would be the suggested gage for the 12 volt wire coming from the from power up front to the power supply?


Greg, I have these on my plane and am very happy with the price and performance. These low draw LED units draw fewer amps, thus need lighter wiring.

You need to figure voltage, amperage, distance to carry load and 43.13 will also ask about voltage drop and whether you're in a bundle or not. I'll give you a call.

(I used almost universally 18ga wire in red and black for most of my (load) wiring, just to keep it common as long as it was heavy enough.) Obviously, wiring to starter and solenoids and main bus will be heavier.

Cal
 
Folks

I had the privilege of going to Oklahoma and visiting with a great group of guys there and tried to help Greg a little with his build.

IMG_12022.jpg

L to R Cayden - training to become professional pilot, out of college and building his hours. We exposed him to the dark side of pure fun flying. I'm afraid he has been corrupted for life. Poor kid. Greg - building his dream cub. Brian - welder and general mechanical guru - can fix or engineer pretty much anything. Bill - new Cub guy, learning fast and fully corrupted. Me - general instigator of all corruption. Dave - fully corrupted and helping me corrupt others.

IMG_1205.jpg

Gregs garage full of Cub. This is a "one off" kit from the founder of all Supercub Kits - Nick Smith, who is helping Greg get back in the air. Nick has gone way way over and beyond to help Greg. Thank you Nick!! There are some really good people in this world and Nick is one of them.

IMG_12031.jpg

Aerodynamics 101. When not working on the Cub we spent a little time visiting about flying. Imagine that!


IMG_12071.jpg

We built up the large heavy wires. #4 CCA Fatwire for the Battery to Master relay, to Starter Relay, then to Starter. #8 gauge from alternator to main bus etc

P1010973.jpg

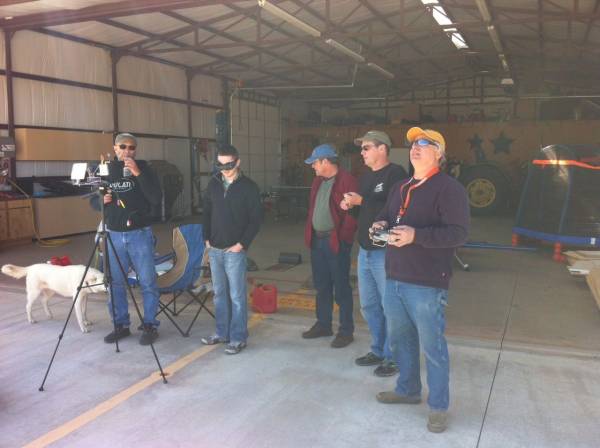
You have to love it when the hangar is full of model airplanes. These guys eat, sleep, and breathe flying.


P1010975.jpg

Bill and Dave's Cub Crafters Top Cubs. When not flying these......


P1010974.jpg

Dave's YAK. Wow man what a machine and Dave is an awesome pilot as is Greg and some other guys that were there visiting. Oh yea....we also had some great ping pong games. Dave clobbered me.

IMG_1208.jpg

Greg's 1/4 scale J-3. Just great fun.


IMG_12091.jpg

Greg let me fly it but I'm not very good so I had to keep it high and let Greg land it. He does great wheel landings with it. It is fun to watch him work.

IMG_11971.jpg

We all got to watch Terry fly this IR equipped copter......


IMG_1210.jpg

Then got to look through the googles to see what it looks like (not IR) but with real time video. Way way cool. Lots of technology there.


IMG_12111.jpg

Caden looking through the googles


IMG_12011.jpg

Dave was kind and trusting to let me fly his Cub so I gave Caden a ride. He will never be the same.


IMG_1192.jpg

Bill's stunning CC Top Cub
 
IMG_1193.jpg

Greg with his 1/4 scale J-3


IMG_1196.jpg

Dave getting the YAK out...


IMG_1212.jpg

Testing Brian's home designed rotisserie. Worked great.


IMG_12131.jpg

Brian - the metal man - with his latest work.

IMG_12042.jpg

Bill and I making up some wires. When we were not eating, flying Top Cubs, flying models, playing ping-pong, etc. we actually got some work done. Sorta......


Many thanks to a great group of good Christian men. It was fun.

Bill
 
As you can see we had the the honor of having Bill come and school us in many areas. He was a great help to Greg getting all big wiring lined out. We tried to help but I think he would have made more progress solo:wink:. Day two, Bill pushed Billy and me out of our comfort zone in our CC cubs. He is really an excellent instructor and we both learned a great deal. I am not really sure who had more fun, the students or the teacher. We spent the afternoon model flying and lots of pulled pork, potato salad, beans, etc. In the evening Terry Dow showed up so we had to go and fly some more (darn).

Good times and great friends at The Good Life Ranch. Thank you Bill...
Talked to Kaden today... He said had the 3rd best day of his life at your get together. Only his wedding day and kids birth beats his time at your place! You and Bill are always making people smile.
 
I thank God for my friends so much! I'm pretty humbled. All I can say is when the Rock gave way a couple of years ago, No friends jumped off and a lot have jumped on. How Blessed I Am. Moving forward with a load of momentum! Thank You, Greg
 
Question? Little history first. I have rigged the flap bell crank return cable and spring. It seams to have allot of tension. The hole in the spars for the tab at the end of the spring were pre drilled for me. I had a used cable and spring from Nick and made my new ones the exact length. My springs came from Javron for this task. I think I've done everything right. It took me and two neighbors to get the crank bolt in. My question is does the flap handle just have the leverage to over come the tention? Does this sound normal?
 
With my old flaps which were 93" long it took around 20lbs to hold them up with my new flaps which are heavier it takes 30lbs that's each.
 
Here is a brief update. I have knocked out my punch list. I believe Im going to start covering on my days off this set. I will start with the tail feathers first. If it gets to hot by the time I get to the wings, I've already been gently working the inside the house wing covering idea. So far Kimmie has not said no way yet. I have all the Stewarts I need to get through Silver if my Silver is still good. I also need to order the inpection supports from Steve. I need to thank some fokes. I recieved some much needed avionics and misc. from DW, A big thanks to him for the parts and also his knowledge. I also recieved Avionics from Bill Rusk, Jim Priess and Rick Durham among other people, Thank You. I think all I am lacking is a Cub airspeed and it is recomended that I get a Fuel totalizer. I'm hoping the wife is getting the Airspeed for me for my birthday, I put a plug in for it. :) Little wing and I are planning to knock out the prewiring soon. So all that being said I am starting to see the light. Thats all I have for now, I will post some pictures next week of a little covering I hope. Thank you to all my friends on this sight. Greg
 
Stewart Glue on my fingers. I have one horizontal covered on the bottom side. Watching the Stewart videos when questions arise. Im covering, finally. I have said for years I'm close to covering, well I am. :). It's going to take a while. I'll post some pics soon. Will love to see this cub in the Bullet in a month or so. Greg
 
Fantastic Greg keep plugging away......very soon it will be test flight time.
 
photo (13).JPGphoto (14).JPGphoto (15).JPGphoto (16).JPGphoto (17).JPGphoto (18).JPGphoto (19).JPGphoto (20).JPGphoto (21).JPGphoto (22).JPG
Here are some pictures of my first bit of my first covering project. The guy on Stewarts does a great job of explaining and showing me how much experience will help me. I have my one inch glue line and it looks strong. I have a few bumps he didn't have. I'm happy with it though. That's the update on this slow progressing cover job.
 

Attachments

  • photo (13).JPG
    photo (13).JPG
    109.7 KB · Views: 228
  • photo (14).JPG
    photo (14).JPG
    117.4 KB · Views: 212
  • photo (15).JPG
    photo (15).JPG
    130.6 KB · Views: 202
  • photo (16).JPG
    photo (16).JPG
    126.5 KB · Views: 194
  • photo (17).JPG
    photo (17).JPG
    120.8 KB · Views: 192
  • photo (18).JPG
    photo (18).JPG
    129.8 KB · Views: 188
  • photo (19).JPG
    photo (19).JPG
    100.8 KB · Views: 224
  • photo (20).JPG
    photo (20).JPG
    132.9 KB · Views: 207
  • photo (21).JPG
    photo (21).JPG
    101.1 KB · Views: 215
  • photo (22).JPG
    photo (22).JPG
    109.9 KB · Views: 190
Saw the Snap-on guy last week, picked up one thing I really wanted for the wiring and ordered some more,,,,,well,,,,,way more than I should have, but I think we've got all we need. Ready when you are, but would like to come over and learn about covering too. Give me a call when you've got room for me brother. I'm really getting stoked for ya!
 
Thank you guys. I just keep hitting it. The second stab is coming along a little quicker, I feel my experience growing already. Little Wing, you are always welcome over here. I appreciate all the support guys, I have been highly motivated lately but there have been times when you guys and all the good threads have kept me going. Ill post some more pictures after I've covered a few of these tail feathers. I plan to cover all the feathers and then go back and do stitching and finish tape. Let me know if there is a problem with doing it that way. Greg
 
You will be wanting to put on the drain grommets before finishing. They go on the bottom. Have you determined which surface will be left or right? There are often small differences in like parts. It will be a good idea to assemble the elevators to the stabilizers before you finish, just to be sure. Look at how the elevator balance arms match up with the end of the stabilizers with the control horns bolted together. Sometimes if you swap them, they will look better.
 
Skywagon8a, I have chosen right from left and we test rigged it with Steve at Pearce Aero. I appreciate you mentioning the drain. Does anybody have a good picture of the drain that you could post on here? I did the right stab first because it is the side less seen. :). I'm getting my son some breakfast this morning. He is taking petroleum engineering finals this week at OU. After I'm done with breakfast I'm going to finish up the left side top. I have the bed of glue tacking up now for the top side. Thank you for the reminder Skywagon8a. Greg
 
I make my self laugh. Hello, the right side is most seen. Oh well all that thinking did mr know good. Oh well at least it came out good. I will attempt to get it right on the rudder. Greg
 
I'm sure you've already considered the pros and cons of drain grommets. But just in case you're doing it because that's what everybody else has, they really aren't necessary for most missions. Putting drain holes in is good enough and reduces cover and paint time.
 
Back
Top