• If You Are Having Trouble Logging In with Your Old Username and Password, Please use this Forgot Your Password link to get re-established.
  • Hey! Be sure to login or register!

Building a Javron Cub

fancypants - Thank you. Learned something.


P1020967.jpg

Fooling with the fuel sight gauges today. The first thing you will note is they are NOT the same size as the fuel tank bungs. The fuel tank bungs are about 5 3/8" apart (center of hole to center of hole) the sight gauge is about 7 1/4 hole to hole. The fuel lines will not be straight out to the sight gauges. There will be a little bend in there. Its OK.


P1020966.jpg

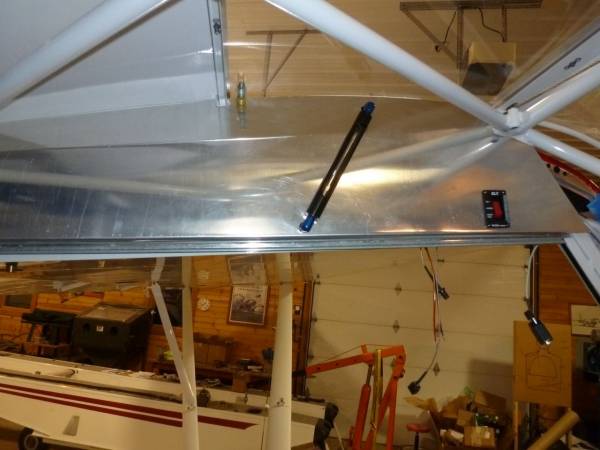
Next thing you will note is they won't fit straight up and down, they have to be slanted. Its OK. But when you make your slant be sure to watch out for this guy. You will actually straddle this "C" channel brace.


P1020969.jpg

It will look like this from the backside.


P1020970.jpg

I put my lower hole in line with the lower bung and about 1" up from the bottom of the door window (right side).


P1020971.jpg

On the left side you will measure from the bottom of the window channel. That way they are both at the same height.


P1020972.jpg

I used about 3 1/2" of slant. That puts the center of the top hole about 3/4" down from the skylight.


P1020974.jpg

My friend Bernie has built 4 airplanes and is an expert on electrical stuff (I'm not). I was telling him about my idea to put the PTT switch in the throttle....he says....."I think I can help you with that". Next day....bam....I have the PTT switch in the throttle. Has a nice feel to it too. How cool is that? I didn't get a part # from him but I'll see if I can in case someone else might like to do this.


P1020973.jpg

Another shot of the PTT switch in the throttle ball.


Hope this helps

Bill
 
Bill, I think the "proper clamps" Mike mentioned are shown as 80002-27 "CLAMP - Cowl support tube" in the PA-18 parts catalog. Univair has them. I tried using adel clamps, with and without the rubber sleeve, but was unsuccessful in keeping them where I wanted them. The Univair part stays put.

View attachment 19670
i tried using Adel but they slip and a little oil on them and the rubber falls apart so I made some out of stainless but the steel one will be even stronger.
 
Bill you can now use the old probe hole for your belly fuel tank .
 
Last edited by a moderator:
Excellent idea. I love this place. I did not think of that (not thinking of the belly pod yet, still jet trying to get the basic Cub done) but what a great idea.

Thanks DW

Bill
 
IMG_16982.jpg

So...... my good friend Cal.........


IMG_1696.jpg

.....and Frank came by to check up on things, and while here they did a little carpentry.


P1020986.jpg

They built this little thing.... and.....


P1020985.jpg

This little thing in the front.....and.....


P1020987.jpg

Drop a piece of plywood on them and now I have a way to lay on my back and get up and behind the panel for the wiring. We put a couple of long bolts (you can see one sticking up for reference) in there with no nuts just to keep the plywood from sliding. Goes in and out in a few seconds and is sure handy when working in the cockpit. Thanks to Cal and Frank.


Today I discovered that all those cool GPS antennas are not designed to be externally mounted. Crud. I was planning to mount them on the wing root fairing. I was told that would not be a good idea. The external ones are mega expensive. (I have three GPS antennas = 1 for the GRT, 1 for the 796, and 1 for the XM system)
Here we go.....PROBLEM - where to mount GPS antennas. Many possible solutions. I chose this one......


P1020977.jpg

I made a little tray. Its about 3 1/2 X 7 1/2. out of .020


P1020979.jpg

It fits between the fuselage and the windscreen, using the screws already there.


P1020980.jpg

Looks like this from the inside. I think it will work OK. I don't think it will be in my vision and they should get good reception.


P1020982.jpg

For your interior cover panels there is just enough room behind the down tube, in the attached "C" channel to get a Riv-Nut. Although I am not a huge fan of Riv-Nuts, they are a lot better than a sheet metal screw (IMHO).


P1020912.jpg

If you look at the left door post you can see at the edge of the trim piece, the welds and seam show. I did not like this. Just seemed like it could be better. So I redid it.......


P1020984.jpg

I made the trim piece just a little wider so that it covered the welded seam.


Hope this helps

Bill
 
Last edited:
Haha, thanks Mike. I will, but it always seems you need to get up under there for something. Figured I would just get ready in advance.

Bill
 
Bill,
I wired and completed the panel installation before I installed the firewall and wraparound for the final time. Didn't have to go under the panel once.

Also, My GPS 695 works in the hangar without the external antenna so I didn't bother to install one. Are you sure that you need all of those antennas?
 
Bill,

Why not mount at least the XM antenna, and maybe one GPS antenna on top of the glare shield? Simple, less wiring (hole through glareshield for cables) and works great. All that extra wiring you're adding will really screw your weight goals....:lol:

MTV
 
Mike - you could certainly do so. Good thought.

Steve - good idea, wish I'd have thought of that.


Shopping List

Several folks have asked for this, so here is my best shot. It is not complete and your preferences may vary, but perhaps this will help.

McMaster- Carr

#6208K142 - Clamp on Shaft Coupler - for electric trim
#6409K18 - DC 12Volt electric motor - for electric trim
#97022A440 - Shims for the torque tube
#13985A24 - Tool Holder - this is the clip for the cowl door brace rod that holds it open, if using 3/8 aluminum tubing like fuel line
#9307K13 - Grommets for the fuel sight gauges where they go through the wing root panel (use a 3/8 hole), (included with gauges at Javron)
#3014T62 - Lift rings for float changes (each ring is rated for 1400 pounds)

Cub Crafters

Electric Trim Switches
Window (door) latch that goes under wing and holds the window open (theirs seems to work the best) #SC23050-001
Gap Seals for the tail

Aircraft Spruce

#11-09325 Kannad Integra 406 ELT (has built in GPS)
#11-07994 Antenna for Kannad ELT above
#11-07361 Aveo Posistrobe XP (strobe tail light)
#11-07933 Aveoflash Ultra Wing Tip Strobe/Position lights
#13-03500 Vista Vent - my favorite window vents, I got two
#11-17995 TED Transponder Antenna
#11-01596 18 Gauge Black Wire - I got 100'
#11-01597 18 Gauge Red Wire - 100'
#11-14518 18b Gauge White Wire -100'
#6749 Fuel Shut Off Valve
#08-01029 Thermo Guard Firewall Blanket
#11-03162 Starter Solenoid
#11-03161 Master Relay
#10-01224 EI FT90 Fuel Flow Transducer
AN823-6D 45 degree elbow that goes into gascolator (Vans Gascolator, it uses 1/4 NPT fittings) the fuel line to carb connects here
AN913-6D 1/4 NPT plug for the other hole in the gascolator that you will not be using, thus we plug it
#05-17700 Finger Strainer - need 4 - one for each fuel pick up in the tank
AN840-6D This is the fitting that goes in the finger strainer so you can slide the fuel line on it - thus you need 4 of these
AN840-4D This goes in the fuel sight gauge holes of the tank so you can connect a short fuel line to the sight gauges - need 4
#05-01870 Curtis Drain Valve CCA1600 - has a 1/4 NPT for your tanks - need two - this will barely (but it will) fit between window when open
AN394-41 clevis pins for flaps and aileron hinges, Javron will be including these in the future

3/8 X .035 Aluminum Tubing for fuel lines - 36'

Vans Aircraft

#GAS5 gascolator
#CAV110 drain valve for above gascolator
CT-A-740 Red knob Push pull cable for the mixture
CT-A-740 Black knob Push Pull Cable - need 2, one for carb heat, and one for cabin Heat
CA Baggage Tie Down - I got these to attach a net, or ropes, to tie cargo down
BAF-360 Engine Baffling Kit - this for the 0-360 (different # for other engines)
ES-A-510-2K Ignition Switch. This is a key start switch, comes with two door locks, all keyed alike
F-P5000 - Oil Quick Drain valve

Wag Aero

E481000 Fuel Caps - get a spare and paint it with the others - this is about the only place I could find these caps - you bend the tube forward
C-160-100 Radio Antenna - This is a nice unit - RAMI

B&C

GB 24 Ground Bus
FH-12 Fuse Holder
Fuses
Ground Strap
Ring Terminals for Battery to Master relay and starter relays
S891RB-10 Butt Splice Terminal (gonna need a bunch, like 100)

Perihelion Designs

#4 Wire for battery to Master, and from starter relay to Starter
Associated lugs for above wire


MISC

Fabric for Seats - Active Foam Products
Foam for Seat cushions - Hi-Tech foams
Aluminum .016 for interior panels
Prop Bolts - Saber Mfg
Prop - Catto
Under Seat Storage box - Carbon Concepts (Randy Appling up in Alaska
Seat Belts - Aviation Safety Products Inc
Radio
Transponder
GPS
Co Ax Cable for ELT
Co Ax Cable for Radio
Co AX Cable for Transponder
Master, Avionics, Lights, and other switches
Window Channel - Javron or Stoddards carry it
Covering Grommet Set - I recommend Pierce Aero for this
Exhaust System - I used Professional Pilots Inc (Sutton System)
Oil Cooler # 8000081NE - this is an experimental 10 row cooler. - From Pacific Oil Cooler
2" Scat hose - I got 10 feet (it may come with your exhaust system)
VG's - Micro Aerodynamics
Engine - lots of options here
Carb Air Box - Can get from Javron
Cabin Heat Box - Jay is working on this so the cable operates properly instead of backwards like they all do. Hopefully he will have one soon
Carb Air Filter Assembly
Fuel Sight Gauges - Javron
Brake lines
Battery - I used the Earth X unit
Tires
Wing Pulley Covers - Nice aluminum ones from Aircraft Restoration Supplies in Belle Plaine, MN 800-325-5474
#U12694-003 Univair throttle cable for 150 (plus) engines
#U70371-000 Univair clamp for the cabin heat cable
#U70371 -004 Univair clamp for the carb heat cable
Univair 415-31130-10 Rubber moulding - used between wing root fairings and windshield. Comes in 10' length but you will use 2 about 24" pieces
Plexiglass for windows

Composite material for floor boards, cargo floor etc. Substitute for plywood. Lighter but expensive.
AAR Precision Systems 727-539-8585 14201 Meyerlake Cir. Clearwater FL 33760

ATR-FP-121F1
this is 1/8th inch. I used it for the floor of the upper baggage and the back wall. It is very light but not strong enough for cargo floor or floorboards. At the time I got it, it was 284 dollars for a 4' X 8' sheet. I tried to use it for the side walls in the cargo area but it did not really work out.

ATR-FP-251F1 - 1/4 inch stuff I used for cargo floors, seat backs etc. The "F1" in the name means it is one layer of glass.

ATR-FP-251F2 - 1/4 inch again but two layers of glass. I used this for the front and rear floorboards.


Folks - you don't have to get this stuff from the same place I did (except a few items are one vendor only - assuming you want that specific item)
I know this list is not complete. Perhaps it will give you a place to start.

Hope this helps

Bill


Last edited:
IMO, I don't think you will be happy with Wagaero fuel caps. You cannot grasp them well enough to turn them. I know; I've tried.

The vented ones Atlee sells are far superior because they have vertical tangs to twist. I'm not sure, but I think they can be used with the 180hp conversions.
 
Agree on the wag fuel caps. I hate mine and the vent is ver easy to bend. I thought cub crafters sold the nice atlee fuel caps. For sure those are the ones you want.
 
Thanks for the inputs gents. Do we know if the Atlee caps will fit a Javron tank? I seem to remember from my first build that not all caps would fit all tanks.

Pete - that is the same cap except that the copper tubing is already soldered in so all you have to do is use your tubing bender to bend it forward. Then I flare the end of the tube to get a little more pressure. Looks like this................

P1020996.jpg

I have used the caps with the upturned tabs and I do like them, if they fit that would be a great option.


P1020997.jpg

Cable sub-assembly for the instrument panel


P1020993.jpg

Picture of the clip, noted in the shopping list above from McMaster-Carr, that holds the cowl open.


Hope this helps

Bill
 
Last edited:
Bill, I like to have the end bent down a little bit just in case a little moisture is in the air while parked. It would tend to flow out rather than in.
 
I like the way Luscombe did it 60 years ago. 3/4 tube gets ram air pressurized and it can rain all week and it will run out the 1/16" drain in the back. Did this on my J4 and works like a charm.


Glenn
 
Do you have enough room between the knobs for your fingers to grasp the knobs? It doesn't look like you have enough room to put your two fingers. Or do you just not care to be able to use two fingers and your thumb to push and pull them?
 
Paul - I had the Wag-Aero caps on my last Cub and they seemed to work OK. I do like the turned up caps and if they fit, that seems like a good option. Thanks for that input.


P1030002.jpg

Finalizing the bottom cowl piece. Several folks have asked about the affect of lowering the motor mount 2" and the impact on how things will fit. The Sutton exhaust is a pretty tight fit in a normal SC and... yes... you will have issues after lowering the engine. This is one of the carb heat/cabin heat muffs. It touches the bottom cowl and so I started the cutout here.


P1030003.jpg

But then you need room to attach the scat tubing and room to make sure nothing chafes so the hole gets much larger. (the upper right is the carb hole)


P1030004.jpg

Then you fix it like this. A little scoop and problem solved. It will look like most other cowlings that have a scoop or two.

I will post more cowling stuff tomorrow if I have time.

Hope this helps.


Bill
 
Looking at the length of this thread, and I have a question for Bill and others: Will this plane handle the same when doing a downwind turn?:lol:


But seriously, Bill, your solutions through here are great!
 
Bill Rusk,
I wanted to mount the Kannad ELT antenna inside the fuselage. Emailed the outfit in France for instructions. Not.... You might consider looking at a different ELT if you want the Antenna inside the cage. My antenna was mounted opposite the com antenna on the wing root fairings. Recommended location is aft of the wing trailing edge and forward of the vertical stabilzer... Made a bracket at a stringer stand off...stringers attach to the bracket with aluminum pop rivets
bab0fab31e2b166129346af343608699.jpg
8aa470463024d4a3c7234c8c840625ec.jpg
8f9f657673039dde639459125647473e.jpg


Sent from my iPad using Tapatalk
771d3bd73e5fbdf810f9edd559d8f997.jpg
 
I'm not going to hold my breath on that one. The antenna is cheap. When I disassembled the aircraft to rebuild.......the antenna came off in two pieces.


Sent from my iPad using Tapatalk
 
Thanks for the inputs, Mark. Your project looks really nice!

P1030005.jpg

Played with different carb air box shapes yesterday, here is a rundown.......I will be using the square airbox Vice the round unit......


P1030008.jpg

A little angle......


P1030009.jpg

More angle, following the line on the airbox itself.....


P1030011.jpg

Squared off the back end....


P10300131.jpg

Notched the back end....


P1030014.jpg

Rounded the back end.....


P1030015.jpg

Rounded the edges a little.....winner


P1030023.jpg

In aluminum before rounding edges.....


P1030024.jpg

With rounded edges. Final draft. Now I'll get this fabricated, reinforced, and installed. Then seaplane lip and we are off to the paint booth.


Hope this helps

Bill
 
Back
Top