
You are using an out of date browser. It may not display this or other websites correctly.
You should upgrade or use an alternative browser.
You should upgrade or use an alternative browser.
tools, jigs, fixtures, and other neat stuff
- Thread starter mike mcs repair
- Start date
mike mcs repair
Registered User
chugiak AK
many of the following piper wing tools are displayed in use in the album http://picasaweb.google.com/mike.skup/FabricSteps#
can't remember what the he11 this one is for

for marking screw locations on leading edge skins..


for marking top leading edge screws, if you forgot to mark it before forming skin over rib...


for holding trailing edge false spar tight against rib while you drill it, flap bay


can't remember what the he11 this one is for
for marking screw locations on leading edge skins..
for marking top leading edge screws, if you forgot to mark it before forming skin over rib...
for holding trailing edge false spar tight against rib while you drill it, flap bay
mike mcs repair
Registered User
chugiak AK
Hope steve p will post his leading edge tools and the channel bender.... For a start...
Steve's Aircraft (Brian)
FRIEND
White City, Oregon
Mike,
I have a couple of "specialty" tools, just don't have any pictures of them yet...will try to get some this week.
Brian.
I have a couple of "specialty" tools, just don't have any pictures of them yet...will try to get some this week.
Brian.
Steve's Aircraft (Brian)
FRIEND
White City, Oregon
Just remembered I had a couple of pictures on my phone of my 0-200 / 0-300 cylinder base stud drill guide for installing Helicoils.

This is the alignment tool for installing Helicoils in 0-200 / 0-300 cylinder base studs. One side is for the drill, the other side is for the tap.

The tool installed on a 0-200 that has some pulled studs.

Drilling the proper size hole for the tap, with some rags stuffed into the bore to keep out the drill chips.

Switch the tool over and tap for the Helicoil.
I made this tool from the cut off base of an old 0-200 cylinder that has been turned true on a big lathe. I made the bushings out of some round stock and then welded them in place. The ends of the bushings were stepped down to fit true into the flange.
This is the alignment tool for installing Helicoils in 0-200 / 0-300 cylinder base studs. One side is for the drill, the other side is for the tap.
The tool installed on a 0-200 that has some pulled studs.
Drilling the proper size hole for the tap, with some rags stuffed into the bore to keep out the drill chips.
Switch the tool over and tap for the Helicoil.
I made this tool from the cut off base of an old 0-200 cylinder that has been turned true on a big lathe. I made the bushings out of some round stock and then welded them in place. The ends of the bushings were stepped down to fit true into the flange.
mike mcs repair
Registered User
chugiak AK
welding setup, everything in one spot

rod nice and dry, easy to identify..


rod nice and dry, easy to identify..
mike mcs repair
Registered User
chugiak AK
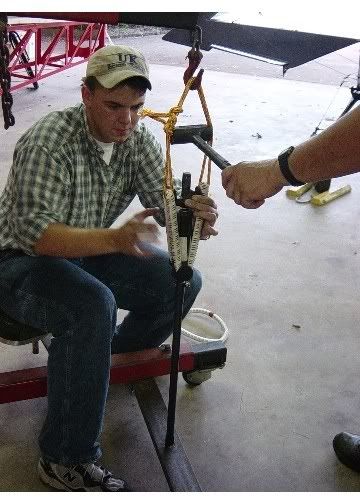
pulley positioning tool for big pulleys.. picture, see above post page one for description

so where are all the pictures from everybody else?
come on, lets see your ideas....
so where are all the pictures from everybody else?
come on, lets see your ideas....
Steve Pierce
BENEFACTOR
Graham, TX
My newest tool is a sheetrock hanger used to install wings. Finally tried it out today. Made getting the strut bolts in real easy because I could crank the dihedral up or down very small amounts to line thinks up perfectly and I didn't have to have someone holding the tip up till their arms ached.


Steve Pierce
BENEFACTOR
Graham, TX
Leading edge skin tools designed by Dakota Cub.


Steve Pierce
BENEFACTOR
Graham, TX
Pulls a new bushing in while pushing the old worn bushing out without belling the end. I use a long ball ended allen head socket. There is a flat on the stationary end.


mike mcs repair
Registered User
chugiak AK
Steve Pierce said:My newest tool is a sheetrock hanger used to install wings. Finally tried it out today. Made getting the strut bolts in real easy because I could crank the dihedral up or down very small amounts to line thinks up perfectly and I didn't have to have someone holding the tip up till their arms ached.
i saw a guy show up and remove wings from a 172 outside on ramp by himself with one of those....
I was quite impressed and scared at the same time!
.
Steve Pierce
BENEFACTOR
Graham, TX
I use this tool to tap a drilled hole for a PK screw. It is made from a coupling nut, piece of rod and a long PK screw brazed in the end.


mike mcs repair
Registered User
chugiak AK
Steve Pierce said:Leading edge skin tools designed by Dakota Cub.
is it possible to post some dimensions for those?
Bushwhacker Air
Registered User
New York
I like the wing lift idea. Can't stand the complaining my 13 year old does everytime I ask him to do that job!! As a bonus, the wing lift won't want to go to a friends house when I need it most!
Great stuff, guys.
Great stuff, guys.
Steve's Aircraft (Brian)
FRIEND
White City, Oregon
Made this Piston Pin "press" in college....

It is simply an aluminum block with a stainless steel band. The screw is made from screw stock.

I made a bronze bushing out of hex stock because I did not want the screw to operate against the aluminum. Plus I can change out the bushing if the bronze threads go out.

I originally used a plastic cap on the end of the screw and a plastic insert to protect the piston. I discarded both and made this pin "pusher" out of an old piston pin plug. Works much better than the plastic.

Here it is in action removing a stuck piston pin on a 0-235 Lycoming....This is much better than using a hammer and drift pin.
Brian.
It is simply an aluminum block with a stainless steel band. The screw is made from screw stock.
I made a bronze bushing out of hex stock because I did not want the screw to operate against the aluminum. Plus I can change out the bushing if the bronze threads go out.
I originally used a plastic cap on the end of the screw and a plastic insert to protect the piston. I discarded both and made this pin "pusher" out of an old piston pin plug. Works much better than the plastic.
Here it is in action removing a stuck piston pin on a 0-235 Lycoming....This is much better than using a hammer and drift pin.
Brian.
Steve's Aircraft (Brian)
FRIEND
White City, Oregon
When my engine stand is not being used, we bolt on this piece of plywood and use it as a tool table for minor project's.....like installing new mag's and carburetor work on this J-3.

Brian.
Brian.
Nathan K. Hammond
Registered User
Danville, KY DVK
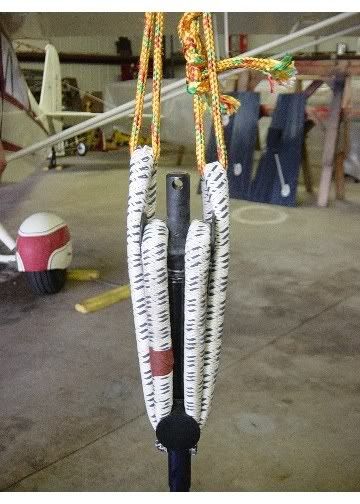
Using a piece of scrap angle to install bungees.
(clicking on the pic loads a larger version.)


Knock a hole in the metal channel so the strut can fit through, then slide a screw driver through the bolt hole to keep it in place. Next take a piece of scrap rope (3/8" braided seems to work best) and make a loop to catch the bungee. Start stretching the bungee using the hoist, you might find it easier if you spread the rope (black hammer in pic). Once you've got the bungee over the ears, release the hoist pressure, cut the rope and use the hoist to pull the rope free of the bungee. When you've got the strut off the airplane, use a piece of chain to hold the airplane up. Just be sure to use bolts and not drift pins.
It's nice, because one guy can do the entire job in about an hour. There is no real grunt work; the hoist picks up the airplane while you remove the struts and insert the chain and the hoist stretches the bungee. No lever to spring back, and no screw drivers to damage the bungees. It pulls evenly on both sides of the bungee. It's safe for you, the strut, bungee and the airplane. And it only cost's a piece of rope.
nkh
gpepperd
MEMBER
Wasilla, Alaska
I used Mike's idea for a u-channel forming tool but did not have a spare forklift fork to bend the channel over so I came up with this. I used 3/8" square stock and shimmed it with a razor blade before I welded the top & bottom halves together. I ground down the 3/8" angle so the u-channel just slips over easily and ground 2 different radius's for bending profiles. Sand this face nice and smooth so tool marks are not hammered into the channe and you are in business.


Darrel Starr
Registered User
Plymouth, MN
Here is one of my favorite tools. It is a Chicago Pneumatic CP0351 - Alligator Jaw Rivet Squeezer with a 9.125 inch reach. Almost all of the riveting in the interior, boot cowl, etc for our Super Cub was made with this tool. Once the rivet sets are shimmed to create the correct squeeze, you can rivet all day long and each squeeze turns out perfectly. These riveters can be bought new for about $2000 BUT they have been around for decades and are available on eBay, Oshkosh Flymarket and other places in rebuildable condition for about $300 to $400. Rebuild seal kits are available. Mine required disassembly and rebuilding (beware of the loose needle bearings that might end up on the floor). The hard steel jaws on mine were a little rusty so I cleaned them up and reblued them. I had an old engine stand so I used it as the base and welded up some rectangular tubes to mount the squeezer. The pedal is one of those $10 Go Cart brake pedals that are widely available. All the other parts in the push cable system were custom made. The bracket holding the squeezer in place is a 4 inch exhaust pipe clamp from Fleet Farm with some shrink tubing around it.
Besides using it for normal riveting, I created a tool to make the indentations required around the flat head Lion fasteners in the lower cowl. That tool set consists of an SM214 flat rivet set machined with a 0.250 hole in it. I pressed an MS20470AD-8-10 rivet (.250 dia, .625 long) into the SM214. The matching set is an SM200-47010 normally used for a .312 dia MS20470 (AN470) rivet. With this setup, I can create the indentations needed for the lower cowl fasteners as the test pieces show.
Darrel
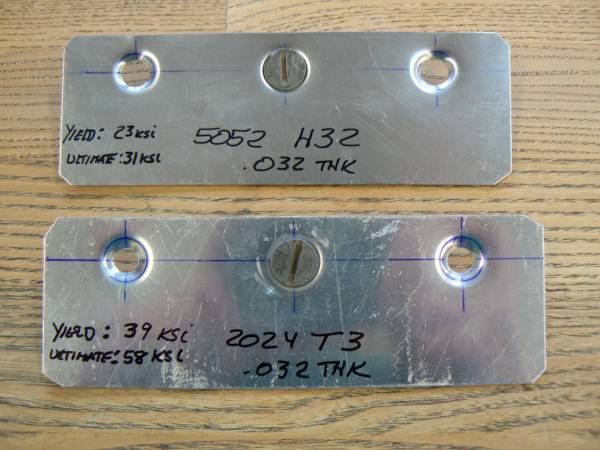
mike mcs repair
Registered User
chugiak AK
siting in hot tub thinking of an unholy marriage of 180Marty's Idea(clamping style) and qsmx440's idea, lathe quick change tool post.....
think it will work great!
think it will work great!
mike mcs repair
Registered User
chugiak AK
gpepperd said:I used Mike's idea for a u-channel forming tool but did not have a spare forklift fork to bend the channel over so I came up with this. .....
very cool...
I have a new way in video above....
I also no longer have the forklift, was just keeping it stored warm inside for my landlord(s).... now its getting taken apart to become parts of an electric truck someone is building near by I guess
anyone find the link yet to thread here that this was based on, guy in tenn or kentucky making window channels for wagaero?
mike mcs repair
Registered User
chugiak AK
kevin said:By the way, this is a great thread.
still wanting more people to stop being shy and share more...
come on we don't bite hard!
I know darrel has more stuff as does steve P, dave C, brian, etc... show your stuff
we will all learn...
behindpropellers
Registered User
NE Ohio
Skup-
When I get to AK I want to come over and see your toys
I have not made any cool tools lately but over the past year and a half I have taught myself how to run a CNC mill. Its not as easy as I thought it was.
instrument panel:
http://lh5.ggpht.com/_2CuH3hJw2t4/St4L9C9qVvI/AAAAAAAAEos/ViqbAjJRyH0/s800/P1010505.JPG
Part I designed and cut....this is for a trade show that we took a camera to a week after I cut the parts, there are 2 halves that need to match up, they fit to some other parts that I designed and had another vendor cut.


This is the camera:

When I get to AK I want to come over and see your toys
I have not made any cool tools lately but over the past year and a half I have taught myself how to run a CNC mill. Its not as easy as I thought it was.
instrument panel:
http://lh5.ggpht.com/_2CuH3hJw2t4/St4L9C9qVvI/AAAAAAAAEos/ViqbAjJRyH0/s800/P1010505.JPG
Part I designed and cut....this is for a trade show that we took a camera to a week after I cut the parts, there are 2 halves that need to match up, they fit to some other parts that I designed and had another vendor cut.
This is the camera:
Darrel Starr
Registered User
Plymouth, MN
Our engine had been majored by The master, Larry Cassem, who could assemble one of these 0-320s in his sleep. I had new baffling from Randy Ruppert from North Dakota. This was all ready to go then I decided to have Darrell Bolduc run the engine at his shop across the airport (KANE). However, the only test cowl that Darrell had required that I remove the baffling. I thought "BS" I've spent too much time to disassemble all this stuff just for a test. Sooooo, I built a test cowl that would fit on my baffling without screwing up the paint. Here it is.
Darrel


Darrel
Darrel Starr
Registered User
Plymouth, MN
I felt that the way to make brake lines was to maximize the hard line length (so the pedal would be firm) which led to having short hoses at the top of the gear legs. The question was -- how long should the lines be so that in the worse case -- if the gear failed, it would all fold up to bang against the struts without pulling the brake lines apart and making things even worse. Here is the fixture I made to make sure the hoses were not too short, not too long but (as Goldilocks said) JUST RIGHT.
Darrel


Darrel
Darrel Starr
Registered User
Plymouth, MN
Shortly after N18SY was restored, we had a problem with the right gear. I didn't want to try to lift the SC from the ceiling of the hangar because the hangar structure is a typical pole barn with a pretty weak structure.
So, I built a gantry (my friends say it is a gallows). The cheapest way to lift things is with $20 trailer tongue jacks from Fleet Farm, so I used six of them -- four to roll the gantry around and two to temporarily lift the plane until 3/8th bolts could be inserted to assure the structure would be safely pinned in place. Lifting was through straps on the engine mount -- worked great. We were underneath it at times so I was glad we had a fool proof way to keep the 1200 lb plane securely "up there". A more talented person would have welded this up out of scrap steel in a jiffy.
Darrel
Steve Pierce
BENEFACTOR
Graham, TX
Darrel, If you ever get board at your place I have many projects for you here in Texas.
Similar threads
- Replies
- 335
- Views
- 107K
- Replies
- 18
- Views
- 10K