
You are using an out of date browser. It may not display this or other websites correctly.
You should upgrade or use an alternative browser.
You should upgrade or use an alternative browser.
Building a Scratch Built Cub
- Thread starter stknrddr
- Start date
stknrddr
Registered User
Greenville (north east), Wi. U.S.A.
Cub Building Update - Lower Door
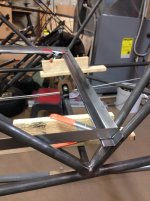
I now have most of my lower door figured out and built. I decided to build a simple door using 1/2"x0.035" tubing for the perimeter of the door, instead of the formed sheet metal pieces as on a stock Cub, and I used 1/4" tubing for the two braces or stiffeners inside the door. The two hinges are the stock style metal piano hinge made out of 0.040" thick steel, which I bought from McMaster-Carr, then I cut them to length. The latch mechanism design is swiped from the Rans Courier I fly which has a simple pivoting handle, similar to a cub throttle lever, with 3/16" diameter tubing (McMaster-Carr) linkages running horizontally across the door and against the interior of the fuselage to hold the door closed.

I outlined the door opening on a sheet of thin plywood.

I cut and fit the tubes, leaving the desired gap between the door and the fuselage. The tubes were tack welded while on the fixture.

I then made sure the door fit properly in the fuselage, and added the brace tubing. I positioned the smaller tubes flush to the outside surfaces of the larger tubes.

I positioned the hinges as shown, using pieces of sheet metal to ensure the hinges were aligned to the door. The sheet metal pieces also position the outside of the door, to the outside of the fuselage. I ended up taping the hinge to the door using electrical tape to hold the hinge in place so the assembly could be removed to weld the hinge to the door.

Realizing that the two halves of the hinge will be sandwiched (closed), I cut the top half of the hinge a little longer than the lower half of the hinge, so we could tack weld the top half of the hinge to the door, without the lower half of the hinge being in the way, while the hinge was taped accurately in place. Later on the lower half of the hinge can be welded to the fuselage.

I drew the latch design and taped the drawing to the door to get a good idea of size and location.

I made the assembly as shown and we welded it in place on the door.

Similar to the Rans Courier door latch, I fabricated a tab with a 10-32 threaded stud welded to it. The tab and stud are welded to the door. I then fabricated a "T" shape assembly consisting of a piece of tubing for the door linkage to pass through, and a small threaded coupling style thing welded together in the shape of a "T". The "T" fitting gets threaded onto the stud. The "T" fitting has the opportunity to rotate a little to follow the slight rocking path of the door linkage when in operation, and it has the opportunity to be adjusted "in and out" to have the right amount of space or interference between the sliding linkage and the mating fuselage tube when closing the door. This type of assembly was fabricated for the front and rear ends of the door. You will notice that there is a positive "stop" welded to the fuselage, for the door to bump up against.

Here is the door in the closed position. I intend to add a threaded stud to the rear linkage, for a knob to be attached, so the person in the back seat has the opportunity to easily open the door.

I intend to add a little retainer guide on the upper door tube, along the door handle similar the retainer guides used at the throttle levers on stock Cubs.
Thank you for viewing.
John
I now have most of my lower door figured out and built. I decided to build a simple door using 1/2"x0.035" tubing for the perimeter of the door, instead of the formed sheet metal pieces as on a stock Cub, and I used 1/4" tubing for the two braces or stiffeners inside the door. The two hinges are the stock style metal piano hinge made out of 0.040" thick steel, which I bought from McMaster-Carr, then I cut them to length. The latch mechanism design is swiped from the Rans Courier I fly which has a simple pivoting handle, similar to a cub throttle lever, with 3/16" diameter tubing (McMaster-Carr) linkages running horizontally across the door and against the interior of the fuselage to hold the door closed.
I outlined the door opening on a sheet of thin plywood.
I cut and fit the tubes, leaving the desired gap between the door and the fuselage. The tubes were tack welded while on the fixture.
I then made sure the door fit properly in the fuselage, and added the brace tubing. I positioned the smaller tubes flush to the outside surfaces of the larger tubes.
I positioned the hinges as shown, using pieces of sheet metal to ensure the hinges were aligned to the door. The sheet metal pieces also position the outside of the door, to the outside of the fuselage. I ended up taping the hinge to the door using electrical tape to hold the hinge in place so the assembly could be removed to weld the hinge to the door.
Realizing that the two halves of the hinge will be sandwiched (closed), I cut the top half of the hinge a little longer than the lower half of the hinge, so we could tack weld the top half of the hinge to the door, without the lower half of the hinge being in the way, while the hinge was taped accurately in place. Later on the lower half of the hinge can be welded to the fuselage.
I drew the latch design and taped the drawing to the door to get a good idea of size and location.
I made the assembly as shown and we welded it in place on the door.
Similar to the Rans Courier door latch, I fabricated a tab with a 10-32 threaded stud welded to it. The tab and stud are welded to the door. I then fabricated a "T" shape assembly consisting of a piece of tubing for the door linkage to pass through, and a small threaded coupling style thing welded together in the shape of a "T". The "T" fitting gets threaded onto the stud. The "T" fitting has the opportunity to rotate a little to follow the slight rocking path of the door linkage when in operation, and it has the opportunity to be adjusted "in and out" to have the right amount of space or interference between the sliding linkage and the mating fuselage tube when closing the door. This type of assembly was fabricated for the front and rear ends of the door. You will notice that there is a positive "stop" welded to the fuselage, for the door to bump up against.
Here is the door in the closed position. I intend to add a threaded stud to the rear linkage, for a knob to be attached, so the person in the back seat has the opportunity to easily open the door.
I intend to add a little retainer guide on the upper door tube, along the door handle similar the retainer guides used at the throttle levers on stock Cubs.
Thank you for viewing.
John
Attachments
-
 IMG_0563.JPG236.7 KB · Views: 256
 -
 IMG_4097.JPG199.8 KB · Views: 253
 -
 IMG_0568.JPG190.4 KB · Views: 259
 -
 IMG_4256.JPG146.4 KB · Views: 245
 -
 IMG_0575.JPG287.6 KB · Views: 356
 -
 IMG_0793.JPG191.7 KB · Views: 303
 -
 IMG_4270.JPG178.5 KB · Views: 391
 -
 IMG_0791.JPG203.9 KB · Views: 329
 -
 IMG_0795.JPG282.8 KB · Views: 252
 -
 IMG_0789.JPG258.2 KB · Views: 253
Great project. Real nice craftsmanship. I Designed and built a cub clone a dozen years ago. Drew my own plans and built every part except windshield and nose bowl. Banged out all wing, flap and aileron ribs. Used Carlson wing spars and lift struts. Fuselage built like carbon cub way before the carbon cub. Bought inexpensive O-235. I didn't build as nice of jigs as you. Spent 15K. Took 10 years.
I see a Waco cabin biplane model hanging from a ceiling. Think I'll build one of those next.
I see a Waco cabin biplane model hanging from a ceiling. Think I'll build one of those next.
stknrddr
Registered User
Greenville (north east), Wi. U.S.A.
Building Update - Torque Tube Installation
The following is additional detail on torque tube construction and installation onto the fuselage.

Bend the torque tube masts using a form as shown. I appreciate Christian Sturm sharing
this method on his SupercubProject web site which I followed.

I drew the mast for paper templates to cut the mast to shape.
I find it handy to include a lot of information on the drawing such as
the type and thickness of the material to use, the orientation of the grain
of the steel, and the drawing number. This helps reduce error when
fabricating the parts.

Clamp the mast as shown in a vise, then heat and bend the
ears on the mast to create nice bends.

Fit and weld the masts onto the torque tube. Use a board attached to
each mast to maintain alignment. Don't forget to add the bearing collars
onto the torque tube prior to welding the masts in place.

The control sticks are made to plans. A paper template was cut and
and taped as shown to get the correct shape of the lower end of the
control sticks.

The lower piece of the control stick was fabricated and drilled.

Carefully align the holes in the mast when drilling, and add bushing stock.
The bushings can be trimmed (sanded) to a final length later.

Use the assembled torque tube as the fixture to position the torque tube
mounting brackets onto the fuselage. Clamp the torque tube onto the mounts
using the bearings fabricated. When welding the torque tube mounts onto the
fuselage, tack weld the mounts in various spots before applying a lot of heat
in one area to prevent the assembly from pulling due to heat. My building
partner, Charlie is doing the welding here.
Thank you for watching.
The following is additional detail on torque tube construction and installation onto the fuselage.
Bend the torque tube masts using a form as shown. I appreciate Christian Sturm sharing
this method on his SupercubProject web site which I followed.
I drew the mast for paper templates to cut the mast to shape.
I find it handy to include a lot of information on the drawing such as
the type and thickness of the material to use, the orientation of the grain
of the steel, and the drawing number. This helps reduce error when
fabricating the parts.
Clamp the mast as shown in a vise, then heat and bend the
ears on the mast to create nice bends.
Fit and weld the masts onto the torque tube. Use a board attached to
each mast to maintain alignment. Don't forget to add the bearing collars
onto the torque tube prior to welding the masts in place.
The control sticks are made to plans. A paper template was cut and
and taped as shown to get the correct shape of the lower end of the
control sticks.
The lower piece of the control stick was fabricated and drilled.
Carefully align the holes in the mast when drilling, and add bushing stock.
The bushings can be trimmed (sanded) to a final length later.
Use the assembled torque tube as the fixture to position the torque tube
mounting brackets onto the fuselage. Clamp the torque tube onto the mounts
using the bearings fabricated. When welding the torque tube mounts onto the
fuselage, tack weld the mounts in various spots before applying a lot of heat
in one area to prevent the assembly from pulling due to heat. My building
partner, Charlie is doing the welding here.
Thank you for watching.
Attachments


stknrddr
Registered User
Greenville (north east), Wi. U.S.A.
A PROJECT UPDATE
Elevator Cable Pulley Brackets,
Baggage Compartment Tray,
Throttle Control and Mounting Brackets,
Front Seat.

The front pulley bracket has been fabricated and installed. Notice that
the retainers that prevent the cable from falling off are held in place
by the small shoulders on the bracket.

Cables were mocked up to properly position the elevator cable
pulleys under the baggage compartment. Notice the baggage
compartment tray is mocked up at this time as well.

The sheet metal supports for the baggage compartment
are welded in place, resting on the rear seat cross member.
I added a short bend on the support to stiffen it. The short
bend on the bottom stiffens the support considerably.
The rear seat belt attachment bracket is also seen here.

I draw many of the parts, and glue the print onto the steel as a template.
This is one of two throttle mounting brackets. Holes are drilled first,

then saw cut to the holes and sand along the edges.

The parts were bent up, drilled, and bolted into place.

Here's a photo of the front seat in the fixture to weld up the legs.
Notice that the rear legs are straight up and down, and are not to plans.

A photo of the front seat almost finished. The seat is welded up to match
the rear most position if the seat were adjustable.

I want to easily remove the seat, so I have short pieces of tubes (sleeves)
welded straight up from the fuselage. Having all four legs running parallel
offers the opportunity to slide the seat legs easily onto the sleeves.
Pins or bolts will secure the seat legs onto the sleeves.

Coming along nicely.

Can't wait for summer to go flying with my wife here in Wisconsin!
Thanks for watching.
john
Elevator Cable Pulley Brackets,
Baggage Compartment Tray,
Throttle Control and Mounting Brackets,
Front Seat.
The front pulley bracket has been fabricated and installed. Notice that
the retainers that prevent the cable from falling off are held in place
by the small shoulders on the bracket.
Cables were mocked up to properly position the elevator cable
pulleys under the baggage compartment. Notice the baggage
compartment tray is mocked up at this time as well.
The sheet metal supports for the baggage compartment
are welded in place, resting on the rear seat cross member.
I added a short bend on the support to stiffen it. The short
bend on the bottom stiffens the support considerably.
The rear seat belt attachment bracket is also seen here.
I draw many of the parts, and glue the print onto the steel as a template.
This is one of two throttle mounting brackets. Holes are drilled first,
then saw cut to the holes and sand along the edges.
The parts were bent up, drilled, and bolted into place.
Here's a photo of the front seat in the fixture to weld up the legs.
Notice that the rear legs are straight up and down, and are not to plans.
A photo of the front seat almost finished. The seat is welded up to match
the rear most position if the seat were adjustable.
I want to easily remove the seat, so I have short pieces of tubes (sleeves)
welded straight up from the fuselage. Having all four legs running parallel
offers the opportunity to slide the seat legs easily onto the sleeves.
Pins or bolts will secure the seat legs onto the sleeves.
Coming along nicely.
Can't wait for summer to go flying with my wife here in Wisconsin!
Thanks for watching.
john
Attachments
-
 IMG_0818.JPG1.4 MB · Views: 257
 -
 IMG_0837.JPG1.5 MB · Views: 251
 -
 IMG_4459.JPG1.4 MB · Views: 310
 -
 IMG_1821.jpg805.2 KB · Views: 228
 -
 IMG_1819.JPG1.8 MB · Views: 210
 -
 IMG_0808.JPG1.3 MB · Views: 296
 -
 IMG_1356.JPG1.6 MB · Views: 277
 -
 IMG_3919.jpg676.1 KB · Views: 315
 -
 IMG_4421.jpg896.9 KB · Views: 276
 -
 IMG_0816.JPG1.7 MB · Views: 280
 -
 IMG_3813.JPG1.8 MB · Views: 479
skywagon8a
MEMBER
SE Mass MA6
Full scale or model? I used to own the last Waco cabin built a VKS-7F. It is a very nice flying comfortable airplane and reasonably fast.I see a Waco cabin biplane model hanging from a ceiling. Think I'll build one of those next.
stknrddr
Registered User
Greenville (north east), Wi. U.S.A.
Project Update - Tail Wheel
The following are photos of my tail wheel section fabrication. Being a light cub, I am going with a two-leaf spring (I think).
I bought the spring (1000 lb. capacity) online, but since then, I found the same spring for sale at my local "Northern Tool"
store (formally "Northern Hydraulics"). The spring cost me $20. It's wider than usual at 1-3/4".
The spring is a trailer spring, used on light duty trailers.

The spring.

When drilling a hole in a leaf spring, use a slow drill speed of about 60 rpm. A machinist friend also mentioned
to me that a flatter cutting tip angle on the drill bit works good when drilling harder steels.
The spring can be cut to length using an abrasive cut off wheel in a right angle grinder.

Use the scrap piece to form the attachment bracket.

Using the scrap spring end to form the bracket. Use Oxy-Acetylene torch to heat to bend.

More bending.

The final shape.

Cut and bend the attachment bracket that gets welded to the fuselage.

The finished bracket.

Fit and weld.

Drill holes and bolt it on. The spring length can be changed as needed, to adjust the caster angle and stiffness.
I'll likely start with the solid tail wheel, in the assembly shown.
Thanks all,
john
The following are photos of my tail wheel section fabrication. Being a light cub, I am going with a two-leaf spring (I think).
I bought the spring (1000 lb. capacity) online, but since then, I found the same spring for sale at my local "Northern Tool"
store (formally "Northern Hydraulics"). The spring cost me $20. It's wider than usual at 1-3/4".
The spring is a trailer spring, used on light duty trailers.
The spring.
When drilling a hole in a leaf spring, use a slow drill speed of about 60 rpm. A machinist friend also mentioned
to me that a flatter cutting tip angle on the drill bit works good when drilling harder steels.
The spring can be cut to length using an abrasive cut off wheel in a right angle grinder.
Use the scrap piece to form the attachment bracket.
Using the scrap spring end to form the bracket. Use Oxy-Acetylene torch to heat to bend.
More bending.
The final shape.
Cut and bend the attachment bracket that gets welded to the fuselage.
The finished bracket.
Fit and weld.
Drill holes and bolt it on. The spring length can be changed as needed, to adjust the caster angle and stiffness.
I'll likely start with the solid tail wheel, in the assembly shown.
Thanks all,
john
Attachments


stknrddr
Registered User
Greenville (north east), Wi. U.S.A.
Project Update - Stabilizer Attachment to the Fuselage
I'd like to share progress made attaching the stabilizer assembly to the fuselage.
I built the stabilizer and elevators a while ago, so I'll begin with a quick review.

A photo of the scratch built assemblies.
Balanced elevators.

We used some original parts to create the templates (fixtures) to make the stabilizers and elevators.
Joe Norris (on this list) loaned us some parts. You'll notice the stabilizer in the photo is not balanced,
so I simply made the stabilizer fixture to accommodate a balance elevator.

A photo of the stabilizer leading edge tube in the fixture.

Bending the heavy tube required making a bending fixture as shown.
I inserted a coil spring into the tube, and using the cupped fixture, the tube bent nicely without kinking.
Don't forget to remove the internal spring if you elect o do this.

A photo of Charlie welding up an elevator.

This is a length of hinge stock. We'll cut pieces off, and cut down the centerline to create
hinges that kind of cup onto the elevator or stabilizer tubes.

When pieces of hinge stock are cut to length, they can be tack welded in place as shown.
The cupped piece acts as an appropriate spacer for fabric and paint allowances.
After final welding, oiliite bushings will be pressed in to obtain the final bushing diameter for 1/4" diameter pins.

The entire stabilizer and elevator assembly then gets placed onto the fuselage.
I clamped tubing vertically to the stabilizer, from the floor up, to balance and "stabilize" the assembly
where it needs to be located. This took a lot of time.

These brackets (saddles) need to be positioned carefully in place and tack welded.

I made and used this gage block to properly locate the stabilizer
from the tail post prior to welding.

Using clamps and blocks to position the tail assembly just right.

Blocks and clamp on the front end. You'll notice that I am not using a jack screw. I'll use a trim tab on
an elevator as I've seen others use. Again, I'm building a light sport plane (I think).

By the way, I used a set of trammel points to square up the stabilizer assembly
to the fuselage. I located a center point on the fuselage about 4 or 5 feet ahead of the tail section,
and trammed the tail feathers equal distance on both the left and right stabilizers.

I used a transfer punch first to locate the hole location in the fuselage tube.
I then drilled a pilot hole, and ran a locating pin to ensure everything was aligned well,
than I drilled the final hole diameter and added a bushing to the lower tube.
Long bolts will eventually hold this assembly together.

This photo shows the stabilizer and elevators in place, with the vertical stabilizer and the rudder
clamped in place. It turned out well.
Thanks for looking.
John
I'd like to share progress made attaching the stabilizer assembly to the fuselage.
I built the stabilizer and elevators a while ago, so I'll begin with a quick review.
A photo of the scratch built assemblies.
Balanced elevators.
We used some original parts to create the templates (fixtures) to make the stabilizers and elevators.
Joe Norris (on this list) loaned us some parts. You'll notice the stabilizer in the photo is not balanced,
so I simply made the stabilizer fixture to accommodate a balance elevator.
A photo of the stabilizer leading edge tube in the fixture.
Bending the heavy tube required making a bending fixture as shown.
I inserted a coil spring into the tube, and using the cupped fixture, the tube bent nicely without kinking.
Don't forget to remove the internal spring if you elect o do this.
A photo of Charlie welding up an elevator.
This is a length of hinge stock. We'll cut pieces off, and cut down the centerline to create
hinges that kind of cup onto the elevator or stabilizer tubes.
When pieces of hinge stock are cut to length, they can be tack welded in place as shown.
The cupped piece acts as an appropriate spacer for fabric and paint allowances.
After final welding, oiliite bushings will be pressed in to obtain the final bushing diameter for 1/4" diameter pins.
The entire stabilizer and elevator assembly then gets placed onto the fuselage.
I clamped tubing vertically to the stabilizer, from the floor up, to balance and "stabilize" the assembly
where it needs to be located. This took a lot of time.
These brackets (saddles) need to be positioned carefully in place and tack welded.
I made and used this gage block to properly locate the stabilizer
from the tail post prior to welding.
Using clamps and blocks to position the tail assembly just right.
Blocks and clamp on the front end. You'll notice that I am not using a jack screw. I'll use a trim tab on
an elevator as I've seen others use. Again, I'm building a light sport plane (I think).
By the way, I used a set of trammel points to square up the stabilizer assembly
to the fuselage. I located a center point on the fuselage about 4 or 5 feet ahead of the tail section,
and trammed the tail feathers equal distance on both the left and right stabilizers.
I used a transfer punch first to locate the hole location in the fuselage tube.
I then drilled a pilot hole, and ran a locating pin to ensure everything was aligned well,
than I drilled the final hole diameter and added a bushing to the lower tube.
Long bolts will eventually hold this assembly together.
This photo shows the stabilizer and elevators in place, with the vertical stabilizer and the rudder
clamped in place. It turned out well.
Thanks for looking.
John
Attachments
-
 IMG_0482.JPG1.8 MB · Views: 315
 -
 DSCF3199.JPG217.5 KB · Views: 264
 -
 d.JPG198.9 KB · Views: 221
 -
 c.jpg177.8 KB · Views: 259
 -
 DSCF3435 - Copy.JPG219.5 KB · Views: 240
 -
 DSCF3460.JPG194.1 KB · Views: 201
 -
 e.jpg622 KB · Views: 266
 -
 f.JPG1.5 MB · Views: 301
 -
 k.jpg815.2 KB · Views: 245
 -
 13.jpg1.8 MB · Views: 282
 -
 i.jpg1.9 MB · Views: 221
 -
 h.jpg1.9 MB · Views: 250
 -
 j.jpg1.1 MB · Views: 239
 -
 l.jpg1.1 MB · Views: 228
 -
 3.jpg1.7 MB · Views: 234
 -
 6.jpg1.1 MB · Views: 283
tedwaltman1
FOUNDER
Delta, CO
Amazing. Very inspirational. Thank you for the pictures and detail explanations.
WanaBNACub
Registered User
Off Airport
This is such an awesome project! Keep the pics coming, your an inspiration for my next build!
stknrddr
Registered User
Greenville (north east), Wi. U.S.A.
Lunch Time Aviation - Project Update
It's lunch time which means a chance to post an update. Baggage Compartment Floor

My baggage compartment is basically to the plans, where
I sheared and bent steel sheet for the rails, and positioned
them onto the fuselage as shown using spring clamps.

The plans call for 0.032" thick mild steel (1025) sheet metal, while I used
0.032" 4130 steel sheet. I dimensioned the pieces per plans, however I
added a little return bend along the bottom edge to add a little
more stiffness to the part. It's the little 1/8" or so bend I added
as seen in the photo.

Here's a photo of the pieces welded in place.
This is the area directly behind the rear seat.

This is better photo of how we welded up the parts.
Charlie did a nice job welding the pieces.
I used flange nuts riveted in place which will be used
to hold the plywood, or composite floor sheet in place.

A photo of the underside of the floor rail with the
flange nut riveted in place.

Here you see the rivets are countersunk onto the steel for a flat finish.
Also shown here is how we welded the rail to the cross member
for the rear seat. This is also a good photo of the additional bend
along the bottom edge of the rail.

This is a rivet squeezer used to crimp the rivets. The distance between
the jaws is adjustable to get the correct squeeze for a given rivet size.
Also shown, is the counter sinking tool, to countersink the sheet metal.

A photo of a piece of scrap plywood in place just to see what it looks like.
I have not decided what to do for the back of the baggage compartment.
Maybe I'll install tabs to attach a similar plywood sheet, or install
a canvas style back; or the lower half of the back may be plywood,
while the upper half is canvas?
Any thoughts and photos of options are appreciated.
Thank you,
John
It's lunch time which means a chance to post an update. Baggage Compartment Floor
My baggage compartment is basically to the plans, where
I sheared and bent steel sheet for the rails, and positioned
them onto the fuselage as shown using spring clamps.
The plans call for 0.032" thick mild steel (1025) sheet metal, while I used
0.032" 4130 steel sheet. I dimensioned the pieces per plans, however I
added a little return bend along the bottom edge to add a little
more stiffness to the part. It's the little 1/8" or so bend I added
as seen in the photo.
Here's a photo of the pieces welded in place.
This is the area directly behind the rear seat.
This is better photo of how we welded up the parts.
Charlie did a nice job welding the pieces.
I used flange nuts riveted in place which will be used
to hold the plywood, or composite floor sheet in place.
A photo of the underside of the floor rail with the
flange nut riveted in place.
Here you see the rivets are countersunk onto the steel for a flat finish.
Also shown here is how we welded the rail to the cross member
for the rear seat. This is also a good photo of the additional bend
along the bottom edge of the rail.
This is a rivet squeezer used to crimp the rivets. The distance between
the jaws is adjustable to get the correct squeeze for a given rivet size.
Also shown, is the counter sinking tool, to countersink the sheet metal.
A photo of a piece of scrap plywood in place just to see what it looks like.
I have not decided what to do for the back of the baggage compartment.
Maybe I'll install tabs to attach a similar plywood sheet, or install
a canvas style back; or the lower half of the back may be plywood,
while the upper half is canvas?
Any thoughts and photos of options are appreciated.
Thank you,
John
Attachments


stknrddr
Registered User
Greenville (north east), Wi. U.S.A.
Builders Update - Scratch built Ribs Finished
I finished building my ribs. Here are a couple of photos.


It took me a long time to decide which style of rib to build. I made samples of different
style ribs to learn which ribs were suitable for me to build. Due to the
fact that I could make this style of rib with minimal shop tools,
and at home, I decided on the single cap strip with intercostals. I basically
fabricated and assembled all the parts using bulk materials.
I also now have a new set of wing spars from Jay at Javron Inc. to keep my building.
I will follow up with another post on the fabrication of these ribs in the near future.
Thanks for looking,
John
I finished building my ribs. Here are a couple of photos.
It took me a long time to decide which style of rib to build. I made samples of different
style ribs to learn which ribs were suitable for me to build. Due to the
fact that I could make this style of rib with minimal shop tools,
and at home, I decided on the single cap strip with intercostals. I basically
fabricated and assembled all the parts using bulk materials.
I also now have a new set of wing spars from Jay at Javron Inc. to keep my building.
I will follow up with another post on the fabrication of these ribs in the near future.
Thanks for looking,
John
Attachments


tedwaltman1
FOUNDER
Delta, CO
Those ribs look GREAT! How did you get the leading edge curve so nice (and consistent)?
Hi,Stknrddr,I am a cub homebuilter in China,I want to know what is single cap strip?Could you show this material by a clearer picture?and tell me composition of aluminium alloy,2024-T3 or 6061T651?Builders Update - Scratch built Ribs Finished
I finished building my ribs. Here are a couple of photos.
View attachment 32726
View attachment 32727
It took me a long time to decide which style of rib to build. I made samples of different
style ribs to learn which ribs were suitable for me to build. Due to the
fact that I could make this style of rib with minimal shop tools,
and at home, I decided on the single cap strip with intercostals. I basically
fabricated and assembled all the parts using bulk materials.
I also now have a new set of wing spars from Jay at Javron Inc. to keep my building.
I will follow up with another post on the fabrication of these ribs in the near future.
Thanks for looking,
John
stknrddr
Registered User
Greenville (north east), Wi. U.S.A.
To answer a couple of recent questions, I have the following to offer:
1. Cap Strip Material used- I used cap strip material from Carlson Aircraft. According to their web site,
the material is 6061-T6 aluminum. They provide both a "T" shape and an "L" shape, and I elected to use the "L" shape.
They're web address is carlsonaircraft dot com.

2. To create a consistent bend at the leading edge - I used a metal shrinker to bend the capstrip slightly into a curve.
Place the cap strip into the jaws and squeeze, move the material accordingly, and shrink...
I fabricated and used a continuous shape form to set the cap strip in to ensure the perimeter of the cap strip matched
the entire profile of the form. Due to the stiffness of the cap strip material, the shrinker is needed to bend the material,
as I found it to be very difficult to create a nice bend any other way.
Mary at Carlson Aircraft advised me to use a shrinker, and I listened to her.

I will follow up with additional posts on the entire rib building process.

Thank you for looking.
john
1. Cap Strip Material used- I used cap strip material from Carlson Aircraft. According to their web site,
the material is 6061-T6 aluminum. They provide both a "T" shape and an "L" shape, and I elected to use the "L" shape.
They're web address is carlsonaircraft dot com.
2. To create a consistent bend at the leading edge - I used a metal shrinker to bend the capstrip slightly into a curve.
Place the cap strip into the jaws and squeeze, move the material accordingly, and shrink...
I fabricated and used a continuous shape form to set the cap strip in to ensure the perimeter of the cap strip matched
the entire profile of the form. Due to the stiffness of the cap strip material, the shrinker is needed to bend the material,
as I found it to be very difficult to create a nice bend any other way.
Mary at Carlson Aircraft advised me to use a shrinker, and I listened to her.
I will follow up with additional posts on the entire rib building process.
Thank you for looking.
john
Attachments


tedwaltman1
FOUNDER
Delta, CO
Again, sincere congratulations for simply AWESOME fabrication work!
stknrddr
Registered User
Greenville (north east), Wi. U.S.A.
Project Update - Fabricating my Scratch Built Ribs
Step-By-Step Rib Building Process.

Here's a photo of the final ribs.

Recall, that I am working with a building partner who is also scratch building
a cub. I made a set of forms (template and die set) to experiment making a
three piece hydro-formed rib which we pressed using a hydraulic press.
Although the rib turned out very nice, I elected to build ribs using the single
piece cap strip, and aluminum intercoastals (truss style), as I could more
easily make these in my home shop with basic tools, and I liked the
single piece rib.

The photo above shows our three piece stamped rib,
my trussed rib, and an original Cub rib.

I drew the traditional USA35B cub rib profile, printed, and glued the print
onto a smooth board (shelf board). I built both left (shown here) and right
hand rib fixtures, as I am using the "L" shape cap strip material, so I wanted
symmetry on each wing regarding the direction of the "L" in the ribs.

I then cut the rib profile from another shelf board and over layed it onto
the print. I then cut a nailed the little blocks onto the board to locate the
intercoastals. Here's a photo of the right hand rib form.

I bought 6061-T6 aluminum cap strip material from Carlson Aircraft (on the web).
I elected to have Carlson machine the flange off at what would be the nose
of the rib (they know where to cut it), so the material may be folded as shown for
mail order delivery.

I used a metal shrinker to set the bends into the cap strips. Insert the material
and squeeze to "set" the bend; keep moving along to bend where needed.
Inexpensive shrinkers can be bought for non-industrial use.

Make sure the final rib fits nicely into the form. Cut the trailing
end of the cap strips to final length. I over lapped the ends and
married them together for a clean and tight fit.

Fabricating Intercoastals - I then sheared a bunch of aluminum to
width, and cut pieces to the approximate required length. I then pressed
a bead down the center of the part using a small arbor press. A friend of mine
milled a slot into a piece of flat steel stock, and welded a piece of round
stock onto a second piece of flat stock to fabricate a bead former. I
did not have easy access to a roller style bead former, and this worked
very well in my home shop.

I then bent flanges on the intercoastals as shown using a small bench top break.

Cut and sand parts to final shape. Place as shown into the fixture,
mark and pre-drill the holes, then drill the final hole size, and add clecos as
you go to hold everything in place.

Ensure the cap strip is always tight against the form when inserting
the intercoastals, and make sure the intercoastals are tight against
their form blocks to maintain consistency. Use clamps when needed.

Pop the rib out of the form, take the whole thing apart to de-burr all
of the holes. Place it all back into the form for pre-assembly, again
using clecos prior to riveting.

Pop the rib out of the form again, and replace a cleco with a rivet, and
continue. You will notice that I drilled some holes in the wood form where
the clecos extend into the form. This is done to allow the rib to set
flat in the form when the clecos are in place. I used solid aluminum rivets
and a rivet squeezer.

I fabricated all of the full length ribs first, then modified the form
slightly to make the shorter ribs as shown.

Before I went too far, I wanted to make sure that the short ribs
were matching up well enough, so I made a short sample of a
false spar and placed it as shown. I was very happy to see
how well everything fit up.

The final stacks of ribs. To reduce complexity and weight, and
having the desire to build light, I will not have flaps, therefore
I have more full length ribs than a cub with flaps has.
I learned these processes by scouring the web, looking at kit plane designs,
and from other builders on Supercub dot org. I hope others can
benefit from my posts as well.
Thank you for looking.
John
Step-By-Step Rib Building Process.
Here's a photo of the final ribs.
Recall, that I am working with a building partner who is also scratch building
a cub. I made a set of forms (template and die set) to experiment making a
three piece hydro-formed rib which we pressed using a hydraulic press.
Although the rib turned out very nice, I elected to build ribs using the single
piece cap strip, and aluminum intercoastals (truss style), as I could more
easily make these in my home shop with basic tools, and I liked the
single piece rib.
The photo above shows our three piece stamped rib,
my trussed rib, and an original Cub rib.
I drew the traditional USA35B cub rib profile, printed, and glued the print
onto a smooth board (shelf board). I built both left (shown here) and right
hand rib fixtures, as I am using the "L" shape cap strip material, so I wanted
symmetry on each wing regarding the direction of the "L" in the ribs.
I then cut the rib profile from another shelf board and over layed it onto
the print. I then cut a nailed the little blocks onto the board to locate the
intercoastals. Here's a photo of the right hand rib form.
I bought 6061-T6 aluminum cap strip material from Carlson Aircraft (on the web).
I elected to have Carlson machine the flange off at what would be the nose
of the rib (they know where to cut it), so the material may be folded as shown for
mail order delivery.
I used a metal shrinker to set the bends into the cap strips. Insert the material
and squeeze to "set" the bend; keep moving along to bend where needed.
Inexpensive shrinkers can be bought for non-industrial use.
Make sure the final rib fits nicely into the form. Cut the trailing
end of the cap strips to final length. I over lapped the ends and
married them together for a clean and tight fit.
Fabricating Intercoastals - I then sheared a bunch of aluminum to
width, and cut pieces to the approximate required length. I then pressed
a bead down the center of the part using a small arbor press. A friend of mine
milled a slot into a piece of flat steel stock, and welded a piece of round
stock onto a second piece of flat stock to fabricate a bead former. I
did not have easy access to a roller style bead former, and this worked
very well in my home shop.
I then bent flanges on the intercoastals as shown using a small bench top break.
Cut and sand parts to final shape. Place as shown into the fixture,
mark and pre-drill the holes, then drill the final hole size, and add clecos as
you go to hold everything in place.
Ensure the cap strip is always tight against the form when inserting
the intercoastals, and make sure the intercoastals are tight against
their form blocks to maintain consistency. Use clamps when needed.
Pop the rib out of the form, take the whole thing apart to de-burr all
of the holes. Place it all back into the form for pre-assembly, again
using clecos prior to riveting.
Pop the rib out of the form again, and replace a cleco with a rivet, and
continue. You will notice that I drilled some holes in the wood form where
the clecos extend into the form. This is done to allow the rib to set
flat in the form when the clecos are in place. I used solid aluminum rivets
and a rivet squeezer.
I fabricated all of the full length ribs first, then modified the form
slightly to make the shorter ribs as shown.
Before I went too far, I wanted to make sure that the short ribs
were matching up well enough, so I made a short sample of a
false spar and placed it as shown. I was very happy to see
how well everything fit up.
The final stacks of ribs. To reduce complexity and weight, and
having the desire to build light, I will not have flaps, therefore
I have more full length ribs than a cub with flaps has.
I learned these processes by scouring the web, looking at kit plane designs,
and from other builders on Supercub dot org. I hope others can
benefit from my posts as well.
Thank you for looking.
John
Attachments
-
 IMG_1500.jpg138.2 KB · Views: 173
 -
 4.jpg119.8 KB · Views: 192
 -
 6.JPG111 KB · Views: 164
 -
 9.jpg105.1 KB · Views: 174
 -
 15.JPG164 KB · Views: 158
 -
 17.JPG172.6 KB · Views: 170
 -
 16.JPG193.1 KB · Views: 168
 -
 20.jpg64.3 KB · Views: 204
 -
 24.jpg56 KB · Views: 294
 -
 35.jpg108.3 KB · Views: 299
 -
 30.jpg47.1 KB · Views: 302
 -
 50.jpg64.1 KB · Views: 301
 -
 54.jpg93.7 KB · Views: 306
 -
 47.jpg39 KB · Views: 299
 -
 60.jpg57.3 KB · Views: 298
 -
 80.jpg158.7 KB · Views: 177
 -
 3.jpg66.3 KB · Views: 238
tedwaltman1
FOUNDER
Delta, CO
Hats off to you for the exceptional dedication and clearly outstanding craftsmanship!
mike mcs repair
Registered User
chugiak AK
To answer a couple of recent questions, I have the following to offer:
1. Cap Strip Material used- I used cap strip material from Carlson Aircraft. According to their web site,
the material is 6061-T6 aluminum. They provide both a "T" shape and an "L" shape, and I elected to use the "L" shape.
They're web address is carlsonaircraft dot com...
john
ah, thats probably where the backcountry gets their rib material is from? it's an L shape... but that website is not responding at the moment for me...
I think this type cap strip more suitable,from Dokataah, thats probably where the backcountry gets their rib material is from? it's an L shape... but that website is not responding at the moment for me...

Attachments

Last edited:
stknrddr
Registered User
Greenville (north east), Wi. U.S.A.
Project Update - Simulated Wings

I finished the fabrication of these mini-wings which I will use to position the
"wing attachment fittings" to the fuselage. I want to ensure the center-to-center
distance of the fittings will be match the actual wings I make, as well as be at
the correct angle to the fuselage. By mounting the mini-wings to the fuselage,
I will also be able to install the Piper style channel above the cabin area, to
ensure the airfoil shape above the cabin area matches the airfoil shape on
the wings.

I bought new wings spars from Javron, located in Minnesota. Jay DeRosier
at Javron delivered the spars to Oshkosh where I picked them up. Jay also
provided some scrap pieces of spar stock for me to make the mini-wings.
I fabricated a wood frame of the appropriate size to square up and solidify
the wing assemblies.

I bought threaded studs from a local hardware store. One end of the stud is
threaded as a wood screw, and the other end is threaded as a machine screw.
I drilled through the spars, into the wood frame, then threaded in the stud,
followed by using a wing nut to fasten it.

I attached the ribs to the spars, and added a piece of leading edge skin.

I then fabricated a piece of trailing edge material and attached it.

The simulated wings turned out pretty good. Making the wings
provided me the opportunity to investigate the assembly
process of a lager wing, and use them to fit the wing attachment
fittings. Most importantly, I was able to physically test the fit up
of the ribs to the spars, to ensure everything was built correctly.
Thank you for looking.
john
I finished the fabrication of these mini-wings which I will use to position the
"wing attachment fittings" to the fuselage. I want to ensure the center-to-center
distance of the fittings will be match the actual wings I make, as well as be at
the correct angle to the fuselage. By mounting the mini-wings to the fuselage,
I will also be able to install the Piper style channel above the cabin area, to
ensure the airfoil shape above the cabin area matches the airfoil shape on
the wings.
I bought new wings spars from Javron, located in Minnesota. Jay DeRosier
at Javron delivered the spars to Oshkosh where I picked them up. Jay also
provided some scrap pieces of spar stock for me to make the mini-wings.
I fabricated a wood frame of the appropriate size to square up and solidify
the wing assemblies.
I bought threaded studs from a local hardware store. One end of the stud is
threaded as a wood screw, and the other end is threaded as a machine screw.
I drilled through the spars, into the wood frame, then threaded in the stud,
followed by using a wing nut to fasten it.
I attached the ribs to the spars, and added a piece of leading edge skin.
I then fabricated a piece of trailing edge material and attached it.
The simulated wings turned out pretty good. Making the wings
provided me the opportunity to investigate the assembly
process of a lager wing, and use them to fit the wing attachment
fittings. Most importantly, I was able to physically test the fit up
of the ribs to the spars, to ensure everything was built correctly.
Thank you for looking.
john
Attachments


mike mcs repair
Registered User
chugiak AK
Project Update - Simulated Wings
I will also be able to install the Piper style channel above the cabin area, to
john
make sure you take into consideration the thickness of a skylight,(and windshield in front) if you are putting one on... most cubs are wrong, as they didn't come with skylights originally, till later... I'm picky...
stknrddr
Registered User
Greenville (north east), Wi. U.S.A.
make sure you take into consideration the thickness of a skylight,(and windshield in front) if you are putting one on... most cubs are wrong, as they didn't come with skylights originally, till later... I'm picky...
Yes, I understand what you mean. I probably will want to install a skylight, and I'll need to consider how to get everything to line up correctly and neatly up there.
Thanks for bringing this up.
Similar threads
- Replies
- 104
- Views
- 86K