skywagon8a
MEMBER
SE Mass MA6
If it is going in your Bearhawk, why do you need paperwork?
View attachment 31677I've got a set of Pacific Scientific rotary belts that I'd like to rebuild and use. Aviation Safety Products will re - web the belts, add some length to accommodate the floor mount tabs and issue an 8130. I want to add an inertia reel to the front set but they won't do that with paperwork since there is no inertia reel there now. Any ideas?

.jpg")
.jpg")
.jpg")
.jpg")
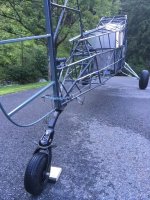
Also, it looks like there may be low points in the fuel line that could accumulate water?? In my opinion the lines should run downhill to the gascolator at all locations, in three point attitude.
T in a quick drain at the low point. Lots of planes have them....... there's no way to make it downhill all the way in a 3 point stance. It's something I've been planning to redo so any suggestions are appreciated.


I'm using Dakota Cubs headerless fuel system and it seemed to allow for this as a way to get the lines to run downhill all the way but really they don't, at least with the 3 inch extended gear and 26 inch Goodyears there's no way to make it downhill all the way in a 3 point stance.
Thanks Steve, that's a big help


 I've been following Pierce's lead. Lots of work in the forward sheet metal, getting things positioned right. I had a banged up lower cowl and a borrowed set of doors and top cowl to pattern from. I started with the top cowl, rebuilt the bottom with Mike's mod and cut the doors oversized then snuck up on the final size. Steel parts blasted and primed, rebuilt the latches. Came out real nice. Beefed up the weak areas, fit the sutton exhaust which is a real nice piece.
Man that's the best bunch of pics of Cubs' anywhere on the interweb. Bravo!I find the Northland CD handy as well as Christian's site, the drawings from the Short Wing Piper Club and the parts manual. Here are links to two photo albums I have uploaded.
https://photos.app.goo.gl/fu4cKYK2yQclL1An2
https://photos.app.goo.gl/ptQXfna4fZUmqRXl2


.jpg")
.jpg")